Afterneath Eurorack Module
Welcome to your Afterneath® otherworldly reverberation machine from EarthQuaker Devices®! The Afterneath sounds a lot like it looks – a wizard in a cave in a Eurorack module. You are the wizard or sorceress, control voltage is your wand and the cave is your instrument’s vast, expansive, and magical signal. Do you go inside?
The Afterneath module brings the otherworldly sounds from the effects pedal world right into your modular synthesizer with an expanded feature set. The Afterneath module features one main audio input, one main audio output, an audio send and return for the Reflect feedback path, and nine controls. Four of the parameters are controllable via CV, and each has been equipped with a dedicated inverting attenuator to process the incoming CV. The Afterneath module has a completely analog dry signal path and a totally digital wet signal path. Each and every Afterneath module is built by a mix of robots and human beans in the torch-lit cave community of Akron, Ohio.
Warning
Electrical Hazard! Improper installation or handling may result in electrocution or damage to your module, Eurorack case or other modules. Always be certain to power off and unplug your Eurorack case or power supply before installing a module. Also, please be certain to cover any empty rack spaces with blank panels.
High signal levels! This device is capable of producing modular signal levels. Please use care when operating this equipment, as high signal levels can damage your audio equipment or your hearing!
*EarthQuaker Devices does not imply nor assume any responsibility for harm to any person or damage to any device or object as a result of the use of this module.**
This device complies with Part 15 of the FCC Rules. Operation is subject to the following two conditions: (1) this device may not cause harmful interference, and (2) this device must accept any interference received, including interference that may cause undesired operation. Changes/Modifications not approved by EarthQuaker Devices LLC could void the user’s authority to operate the equipment.
This equipment has been tested and found to comply with the limits for a Class A digital device, pursuant to part 15 of the FCC Rules. These limits are designed to provide reasonable protection against harmful interference when the equipment is operated in a commercial environment. This equipment generates, uses, and can radiate radio frequency energy and, if not installed and used in accordance with the instruction manual, may cause harmful interference to radio communications.
www.earthquakerdevices.com
EarthQuaker Devices LLC, 350 W. Bowery St., Akron OH 44307
Installation
Power off and unplug your Eurorack case or power supply, and locate 16 hp of empty space within your system.
Connect the 10-pin end of the included ribbon cable to the power pin header on the back of your Afterneath module so the red stripe on the cable is oriented towards the words “Red Stripe” that are printed on the circuit board. Connect the 16-pin end of the ribbon cable to the bus board of your Eurorack case according to the specifications of your case or bus board manufacturer. Be certain that you have oriented your cable properly or you may cause damage to your module or system.
Affix the module to your case with mounting screws that are compatible with your case, and cover any remaining open space with blank panels.
Tech Specs
Width: 16HP / Max Depth: 31.75 mm
Current Draw: 95 mA from the +12v rail, 0 mA from both the -12v and +5v rails
Standard 10-pin Eurorack power connector with a marking to notate the negative pins
Skiff friendly – protrudes less than 1.25 inches (31.75 mm) behind the panel with the power header installed
Audio input capable of handling input signals ranging from instrument-level to modular-level, depending on the setting of the Input knob
We recommend the use of a high quality, low noise power supply.
Warranty
We will fix any of our devices for as long as we are in business. There is never a charge unless the circuit board needs to be replaced due to user damage such as a failed non-factory repair, incorrect power supply, reverse-voltage, modification, water damage, etc. Please visit www.earthquakerdevices.com/warranty for any questions or to initiate a warranty-claim.
Controls
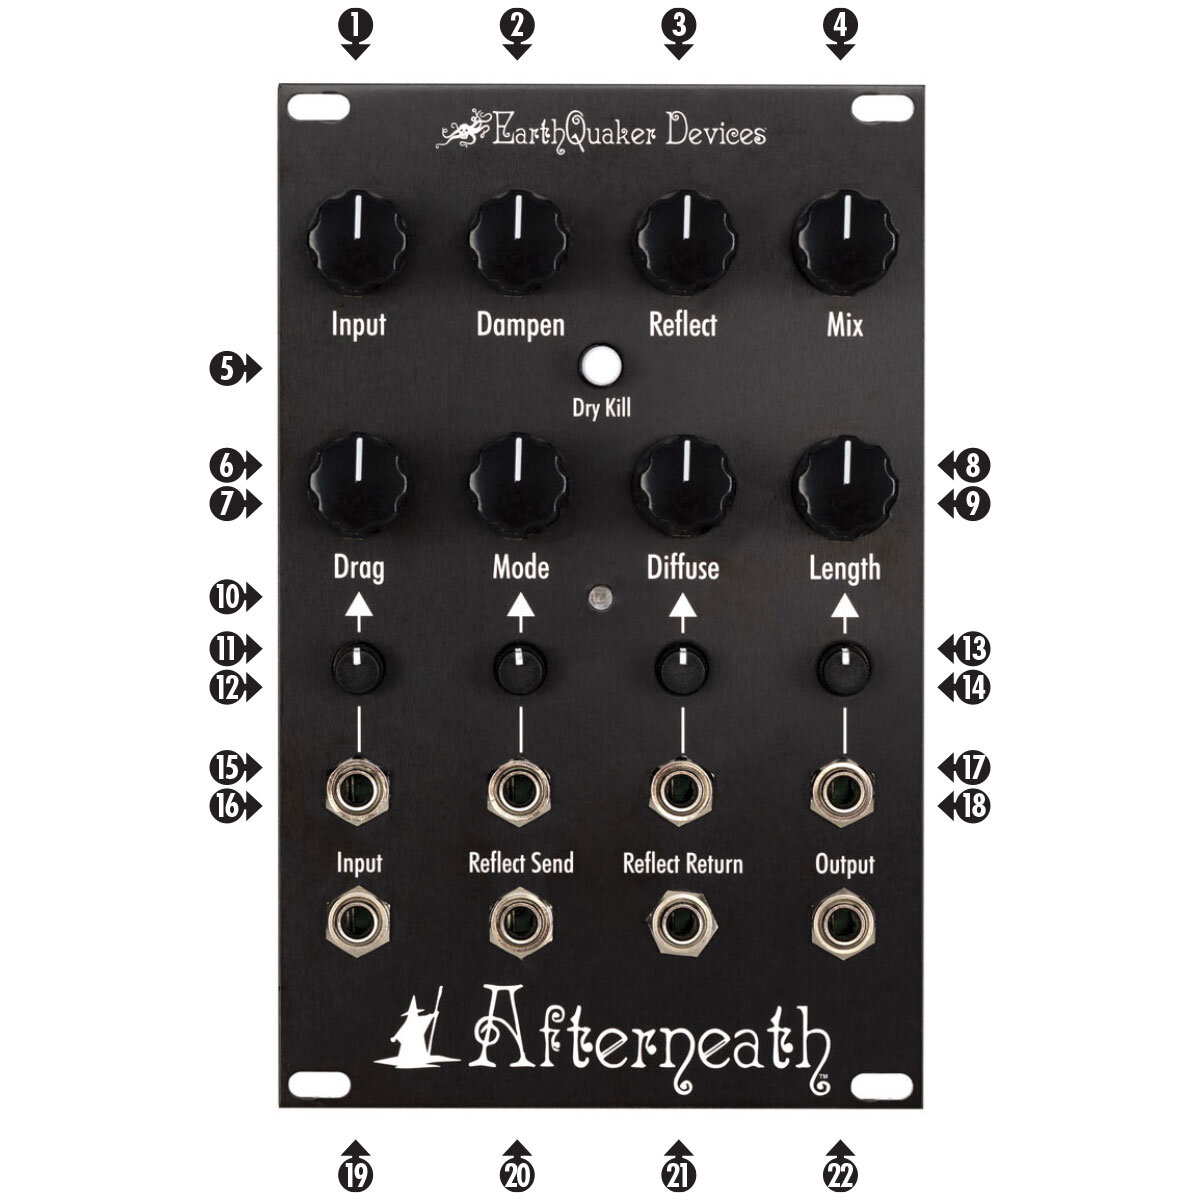
Input: Adjusts the level of the incoming signal to allow for signals ranging from instrument-level (clockwise) to modular-level (counterclockwise).
Dampen: Controls the tone of the wet signal. Clockwise for darker tones, counterclockwise for brighter tones.
Reflect: Controls the regeneration of the reverb, turn clockwise for more wash and echoes, counterclockwise for less. This will self-oscillate if turned up high. Acts as an attenuator when there is a signal patched into the Reflect Return jack.
Mix: Controls the amount of wet signal that is mixed with the dry signal. Though it does not actually go completely wet, you can achieve a fully wet signal by engaging the Dry Kill switch.
Dry Kill: Eliminates the dry signal from the output, leaving only the wet signal.
Drag: This digital reverb is made up of a bunch of short delays. Drag separates the delay lines creating a stuttering, pingy effect. This is the coolest control on the Afterneath. We highly advise slowly turning (or modulating) this while you let notes ring out for a cool warped speed effect. The effect is more delay-like as you turn it counter clockwise, and it is more reverb-like as you turn it clockwise. You will achieve shorter delay times as you move the control clockwise, and longer delay times when you turn the control counterclockwise. You will notice a change in pitch when adjusting this control with sound present in the effects buffer, or when the effect is self-oscillating.
Mode: Controls the behavior of the Drag control as well as how it responds to control voltage. There are 9 different modes (see the following Modes section for explanations).
Diffuse: Smooths and diffuses the delay repeats. Sharper transients with more attack counterclockwise, more ambient, reverb-like and washy as you turn it clockwise.
Length: Controls the decay length of the reverb.
Mode LED: Visually indicates the current mode.
Drag CV Inverting Attenuator: Attenuates or inverts the incoming CV. The CV is at unity gain when the attenuator is fully clockwise, inverted when it is fully counterclockwise and the CV is completely attenuated when the attenuator is in the 12 o’clock position.
Mode CV Inverting Attenuator: Attenuates or inverts the incoming CV. The CV is at unity gain when the attenuator is fully clockwise, inverted when it is fully counterclockwise and the CV is completely attenuated when the attenuator is in the 12 o’clock position.
Diffuse CV Inverting Attenuator: Attenuates or inverts the incoming CV. The CV is at unity gain when the attenuator is fully clockwise, inverted when it is fully counterclockwise and the CV is completely attenuated when the attenuator is in the 12 o’clock position.
Length CV Inverting Attenuator: Attenuates or inverts the incoming CV. The CV is at unity gain when the attenuator is fully clockwise, inverted when it is fully counterclockwise and the CV is completely attenuated when the attenuator is in the 12 o’clock position.
Drag CV Input: Allows modulation of the Drag control using external CV.
Mode CV Input: Allows modulation of the Mode control using external CV.
Diffuse CV Input: Allows modulation of the Diffuse control using external CV.
Length CV Input: Allows modulation of the Length control using external CV.
Audio Input: Accepts audio signals ranging from instrument-level to modular-level, using the Input knob to adjust the level.
Reflect Send: Allows external patching and processing of the Reflect feedback path. Patching from this output does not interrupt the internal feedback path.
Reflect Return: Allows return of the externally patched and processed Reflect feedback path. Also, it can be used as an additional audio input if you wish to forgo the feedback. The Reflect knob acts as an attenuator for the audio that is patched to this input. Please note that processing of the Reflect feedback path can easily result in self-oscillation when processing with effects such as distortion or a resonant filter. The Reflect knob can be used to compensate for this factor. Patching a cable to this input will disconnect the internal feedback path, but the Reflect Send will still be active.
Audio Output
Pro Tip
You can patch both the main Audio Output and Reflect Send to your audio output module for a pseudo-stereo effect. You can add even more complexity and variation by patching the Reflect Send to a multiple, patching one copy of the signal to one of your audio outputs along with the main out (for example, Main out to your left output and a mult of the Reflect Send signal to your right output). Then, patch another copy of the Reflect Send signal to some external processing such as a filter or VCA and then back into the Reflect Return.
Modes
Unquantized: Smooth, unquantized response over the operating range
Unquantized with Slew: Smooth, unquantized response over the entire operating range, but with a musical slew that is reminiscent of turning the varispeed knob on a vintage British tape delay. The “Drag” will lag behind the knob or cv changes, but then quickly catch up.
Unquantized Volt/Octave: Smooth and unquantized, yet scaled to align with the 1v/octave curve to allow melodic modulation of audio in the buffer, or control the frequency of self-oscillation like a voltage controlled oscillator
Chromatic Scale: Quantized 1v/octave to the chromatic scale
Major Scale: Quantized 1v/octave to the major scale
Minor Scale: Quantized 1v/octave to the minor scale
Pentatonic Scale: Quantized 1v/octave to the pentatonic scale
Octaves & Fifths: Quantized 1v/octave to omit all but octaves and fifths
Octaves: Quantized 1v/octave to omit all but octaves
Voltage Control
When using control voltage, the knob associated with that parameter will act as an offset. Therefore, you will want to adjust the knob and the dedicated inverting attenuator to bring the control voltage to the desired operating range for the parameter. It is helpful to start with the knob in the 12 o’clock position and the inverting attenuator fully clockwise, and adjust as necessary.
Self-Oscillation
It is normal for the Afterneath Module to self-oscillate when using higher settings of the Length and Reflect controls – especially when both controls are set above the 12 o’clock position. When you combine the self-oscillation with CV control over the Drag parameter you have an interesting voltage controlled oscillator. Modes 3-9 will allow the self-oscillation to track volt/octave scaling. When using an external control voltage, the Drag knob acts as an offset control for the incoming voltage. Due to the nature of the effect, the Drag parameter responds to only positive voltages between 1.6 and 4.1 volts. When using a voltage between 0 and 1.6 volts, you can turn the Drag knob clockwise to offset the incoming voltage to the response range. Please note that bipolar signals may need additional offset voltage from an external source to bring the entire control signal within the response range.
Keep in mind that the Afterneath is not intended to be a precision oscillator. When self-oscillating, it’s pitch is mostly based upon the note that is played into it. While feeding back, the original note will transform through various harmonic and enharmonic frequencies, depending on the levels of the Length, Reflect and Dampen controls. Careful adjustment of the Length and Reflect controls can allow you to sustain sounds in the buffer for longer periods of time without it becoming unstable.
Volt/Octave Tracking During Self-Oscillation
Turn the inverting attenuator for the Drag CV input fully clockwise, and the Drag knob to 12 o’clock.
Select one of Modes 3-9.
Turn the Length and Reflect knobs past 12 o’clock until self-oscillation is heard.
Find the range of your CV source (Volt/Octave keyboard, for example) that is having an effect on the drag control. Pick the highest note that you wish to play in that range and play it repeatedly while turning the Drag knob back and forth until you find the upper limit of the control (This is the point where turning it any further will not have an effect). Place the Drag knob at the point at which it just passes the point where it no longer has an effect on the scale.
Lower the Length and Reflect knobs until the self-oscillation is no longer present.
Now, you have scaled the range of the Afterneath module to your CV source. Notes played into the Afterneath will now be scaled according to the CV present at the Drag CV input. For example, if you press the “C” key on your Volt/Octave keyboard, and then play a C note from an external source into the input of the Afterneath module, subsequent key presses on your keyboard will result in the correct scaling of the sound that is in the buffer of the Afterneath. Turning the Length and Reflect knobs clockwise will result in the sound being sustained in the buffer for longer periods of time. Higher settings of the Length and Reflect parameters will result in self-oscillation wherein the original sound will transform through various harmonic and enharmonic frequencies of the original sound that was in the buffer.
Modes 5-9 are an excellent choice for non-keyboard CV tracking to impart cyclical or random scaled control of the Drag parameter. For example, connecting a source of random voltages to the Drag CV input will result in the generation of random melodies based upon the scale associated with the mode that you have selected.
We recommend lots of experimentation!