TDAI-2210 Owner’s Manual
About This Manual
For the latest digital version of this manual and further operating instructions, please visit our website at https://steinwaylyngdorf.com or send an email to contact@lyngdorf.com.
Welcome
Congratulations on your purchase of the Lyngdorf TDAI-2210 amplifier. The TDAI-2210 will deliver an audio experience that will far exceed your expectations. We thank you for placing your confidence in Lyngdorf Audio.
Please read all materials carefully before installation. If you require further assistance, please contact your local Lyngdorf Audio representative or send an email to contact@lyngdorf.com.
FAQs about the TDAI-2210, how-to videos, and in-depth information about the technologies used in Lyngdorf Audio products can be found on our website https://steinwaylyngdorf.com/.
Compliance
WEEE
The European Parliament and the Council of the European Union have issued the Waste Electrical and Electronic Equipment Directive. The purpose of the Directive is to prevent waste of electrical and electronic equipment and to promote reuse, recycling, and other forms of waste recovery. Lyngdorf products and the accessories packed with them are subject to the WEEE Directive. Please dispose of any waste materials in accordance with your local recycling regulations. Products and equipment that must be collected for reuse, recycling, or other forms of recovery are marked with the icon of a crossed-out waste receptacle.
FCC
Lyngdorf products and accessories comply with parts 15 and 68 of the FCC rules. Operation is subject to the following two conditions: (1) this device may not cause harmful interference; and (2) this device must accept any interference received, including any interference that may cause undesired operation.
Changes or modifications not expressly approved by the party responsible for compliance could void the user’s authority to operate the equipment. Equipment marketed to consumers must comply with the necessary regulations in the configuration in which it is marketed.
Important safety instructions
Warnings

Caution: Risk of electrical shock. Do not open.
Caution: To reduce the risk of electrical shock, do not remove the cover.
No user-serviceable parts inside. Refer servicing to qualified personnel.
Explanation of Graphical Symbols
The exclamation mark within an equilateral triangle is intended to alert the user to the presence of important operating and maintenance (servicing) instructions in the literature accompanying the product.
The lightning symbol with an arrowhead within an equilateral triangle is intended to alert the user to the presence of uninsulated “Dangerous Voltage” within the product’s enclosure, which may be of sufficient magnitude to pose a risk of electrical shock to a person.
Important Safety Instructions
Please refer to the “Important safety instructions” sheets in the shipping box.
Pre-Installation
Please read all materials carefully before installation. If you require further assistance, please get in touch with your Lyngdorf Audio representative or visit https://steinwaylyngdorf.com.
Unpacking the Product
Carefully remove the unit and accessories from the carton and check for shipping damage. Contact the shipper and your Lyngdorf Audio representative immediately if the unit bears any sign of damage.
Keep the shipping carton and all packing material for future use. If this unit is shipped for service without the original packing, damage could occur, voiding the warranty.
Warning:
Never rest the TDAI-2210 on its front panel.
The volume wheel and its electronics inside may be permanently damaged.
Inventory
Please review the list below to confirm that all necessary product components have been delivered. Report all discrepancies to your Lyngdorf Audio representative immediately.


Operating Voltage
Lyngdorf Audio products must be connected to the mains power system only.
The TDAI-2210 will automatically detect a voltage range of 100-240V and a frequency of 50/60Hz.
Ventilation Requirements
The TDAI-2210 does not have a built-in fan, and it does not require special measures to ensure heat dissipation.
It should be placed according to these guidelines:
Allow at least 1 inch / 2,5 cm of free space on all sides.
Place it in an environment free of excessive heat and sunlight.
Place it on a firm, level surface.
Do not place it on a soft surface (carpet, fabrics).
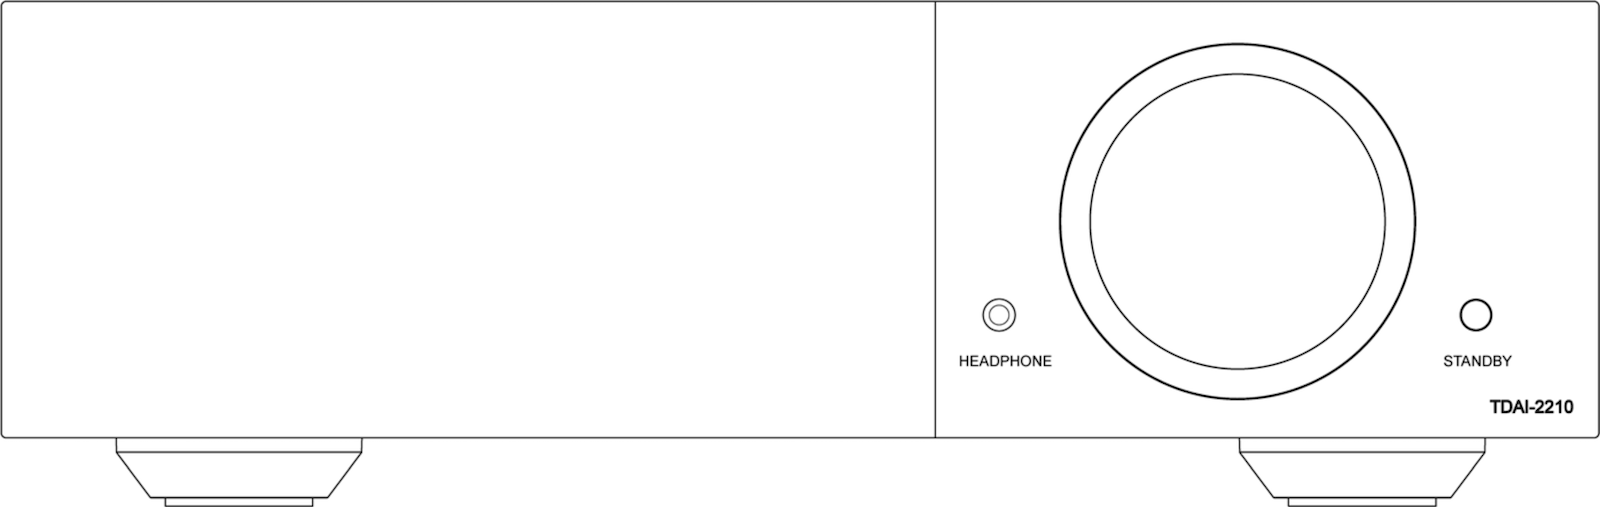
Introduction: Front panel
Left to Right:
Touchscreen display with on/off logo indicator
Headphone output
Dial for volume control
Standby switch
Introduction: Rear panel
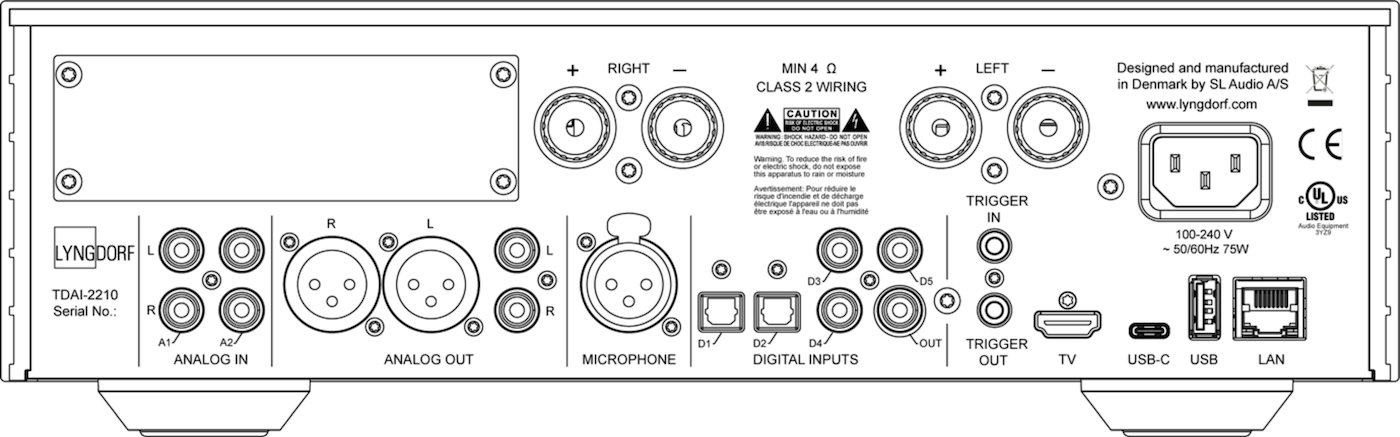
Top Row, Left to Right:
Slot for one optional module
Right speaker output
Left speaker output
1 × Main voltage connector (100-240 V, 50/60 Hz)
Lower Row, Left to Right:
Product name and sticker with serial number
2 × single-ended RCA analogue audio inputs (A1, A2)
1 × balanced XLR analogue audio output
1 × single-ended RCA analogue audio output
1 × XLR microphone input for RoomPerfect
2 × optical TOSLINK S/PDIF digital audio inputs (D1, D2)
3 × coaxial RCA S/PDIF digital audio inputs (D3, D4, D5)
1 × coaxial RCA S/PDIF digital audio output
1 × 3.5mm mini jack trigger input and 1 × trigger output
1 × HDMI eARC (TV)
1 × USB-C input
1 × USB-A port for music file playback, software updating, backup, etc.
1 × RJ45 LAN port for connection to the local network
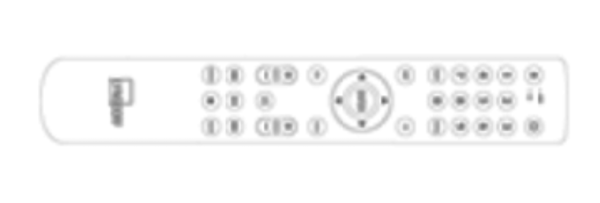
Introduction: Remote Control

The TDAI-2210 comes with a dedicated remote control that operates via Bluetooth (BT) and infrared (IR) protocols.
Using the remote control and the front display, the TDAI-2210 can be operated without a network connection.
Keys and Function Overview
- Display
-
Controls the screensaver
- _
-
Turns the TDAI-2210 on and into standby.
- Numbers
-
For Presets and as keyboard input
- Yellow button
-
Shows a Sound Level Meter on the front display
- Info
-
Reveals information on the TDAI-2210 front display.
- Up and Down arrow buttons
-
Moves up and down in menus.
-
Browses available settings in a menu.
- Select
-
Selects a menu or stores a selected setting.
- Left and Right arrow buttons
-
Moves left and right in menus.
-
Browses available settings in a menu.
- Back/Exit button
-
Returns to the previous menu.
- Menu
-
Accesses the user menu.
- +/-
-
Turns volume up and down.
- _
-
Mutes and unmutes the sound of the headphones
- _
-
Mutes and unmutes the sound of the loudspeakers
- SRC +/-
-
Toggles between enabled inputs (SRC = Sources)
- _
-
Plays/pauses the currently playing track in the media player.
- _
-
Skips in the current playlist in the media player.
How to Pair the Remote Control in Bluetooth Mode (Bt)
The TDAI-2210 remote control features both Infrared (IR) and Bluetooth (BT) modes, automatically connecting to the TDAI-2210 via Bluetooth.
In Bluetooth mode, the indicator on the remote lights up in green when a button is pushed.
If the remote control is not operating the TDAI-2210, you can reactivate the connection.
On the remote, simultaneously push and hold “Select” and “2”.
Release the buttons when the green light starts blinking.
How to Change the Remote Control to Infrared Mode (Ir)
If Bluetooth operation is problematic in your setup, you can change to an infrared (IR) connection.
On the remote, simultaneously push and hold “Select” and “1”.
Release the buttons when the red light starts blinking.
In IR mode, the indicator on the remote lights up in red when a button is pushed.
Introduction: Touchscreen Display
The touchscreen display shows the power status of the TDAI-2210 and allows you to set it up and operate it.
With this display, you can also operate the TDAI-2210 without any network connection.
Lyngdorf Logo as Status Indicator
The Lyngdorf logo on the left side of the display indicates the status of the TDAI-2210.
- Logo not visible
-
TDAI-2210 has no connection to mains power (power OFF mode).
- Dimmed logo
-
TDAI-2210 is in power standby mode.
- Bright logo
-
TDAI-2210 is in power-on mode.
- Flashing logo
-
TDAI-2210 is updating, in starting mode, or going in and out of standby mode. User operation is not possible during this mode.
Switching on a TDAI-2210 for the First Time
Switch on the TDAI-2210 with the STANDBY button on the right side of the front.
The TDAI-2210 will power up, the display will light up, and guide you through the first-time setup.
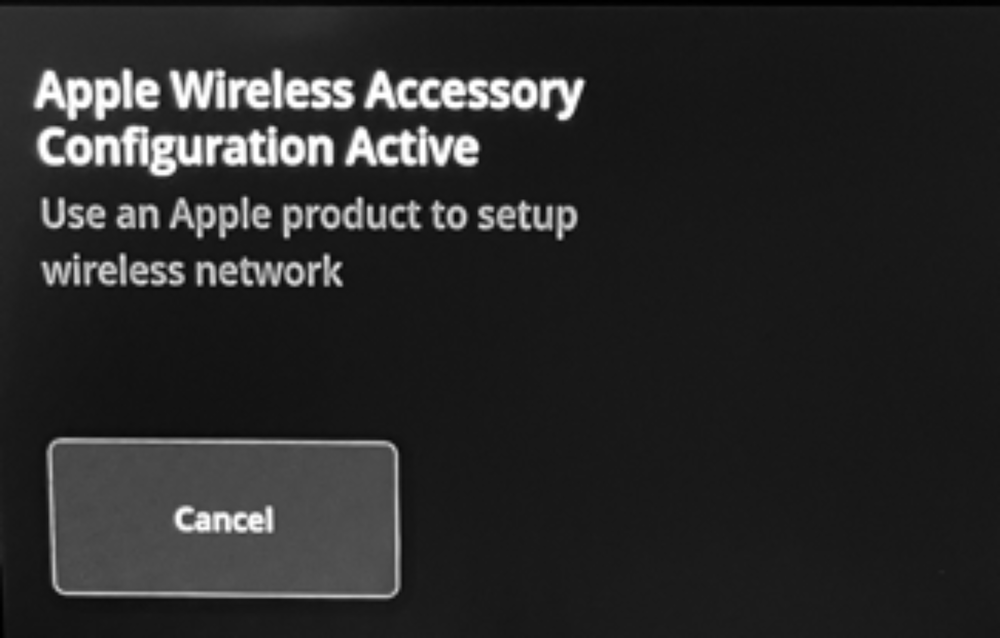
Icons and fields can be selected by touching the screen with your finger tip.
If used with an Apple device and a wireless network, follow the configuration instructions. Otherwise, tap Cancel.
Switching on an Already Set-Up TDAI-2210
Switch on the TDAI-2210 with the STANDBY button on the right side of the front.
The TDAI-2210 will power up, the display will light up, and show the volume level, selected input, and further setting options. Icons and fields can be selected by touching the screen with your finger tip.
Introduction: Remote Control App “My Lyngdorf”
For devices that support Android or iOS, you can download the Lyngdorf remote application, “My Lyngdorf”, which allows you to operate the TDAI-2210.
Installing and Using the Remote Control App With a TDAI-2210 Wired to the Network (LAN)
Visit the app store. Search, download, and install: My Lyngdorf App
Connect the TDAI-2210 to the network via LAN cable directly to find it in the app straight away.
Open the app, select your TDAI-2210 and proceed.

Installing and Using the Remote Control App With a TDAI-2210 Used Wirelessly (WLAN)
Visit the app store. Search, download, and install: My Lyngdorf App
Use the TDAI-2210 touchscreen display first and follow the shown Setup Guide, including setting up a wireless Network Connection. After that, you will be able to use the remote app.
See “Setting up the TDAI-2210 for the first time” on the following pages.
Introduction: Browser App
Instead of downloading and using the remote control app, the TDAI-2210 can also be operated using the browser window of your computer or tablet.
Connect the TDAI-2210 to the network via LAN cable, or use the wireless setup in the touchscreen menu.
Open the browser window on your computer or tablet and type in:
tdai2210.local
Alternatively, to access the TDAI-2210 browser app, use the provided remote control, press the Info button, and note the IP address shown on the TDAI-2210 display. Open a browser window and type in the IP address.
- Open the browser app. Click the white On icon bar, or one of the input icons to switch the TDAI-2210 on.
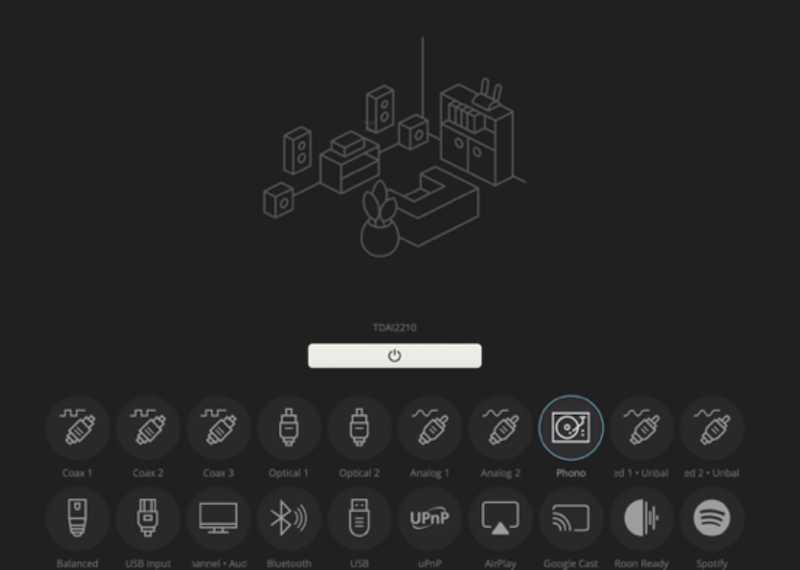
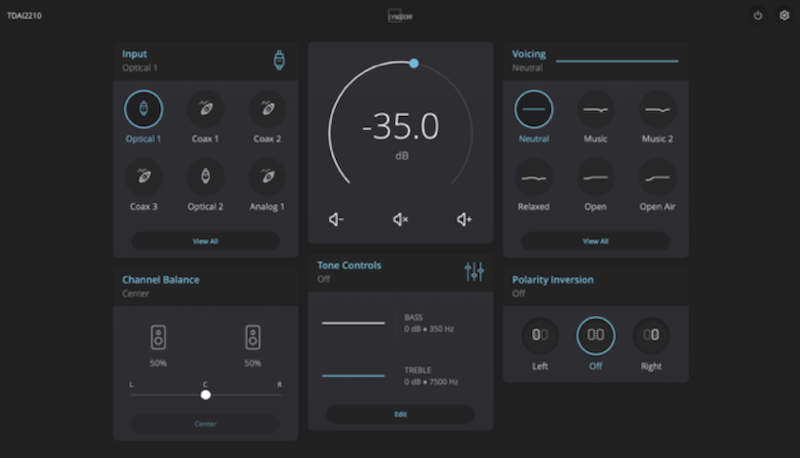
- The dashboard will now show all main controls to operate the TDAI-2210.
- To enter the setup menu of the TDAI-2210, tap the white setup wheel icon in the top right.
To exit the setup menu and return to the dashboard, tap the white “x” icon in the top-right corner.
TDAI-2210 First Time Installation and Setup
Always turn off the TDAI-2210 and other system components before connecting or disconnecting loudspeakers or any other electronic devices.
After unpacking the TDAI-2210, follow these steps for the first-time setup:
While the TDAI-2210 is still disconnected from mains power, connect the left and right speakers to the speaker output connectors on the back (unless the TDAI-2210 is used as a pre-amp or processor only).
Connect your external devices, for example, audio sources or a TV.
If possible, connect the TDAI-2210 to your local network using an Ethernet network cable (LAN).
Connect the mains cable to the connector on the back panel. The TDAI-2210 will now automatically boot the internal processor and then enter standby mode.
Switch on the TDAI-2210 with the STANDBY button placed on the right, or by using the remote control. The front display and the Lyngdorf logo on the left side will light up.
The TDAI-2210 can now be used and is ready for the first-time setup in three different ways:
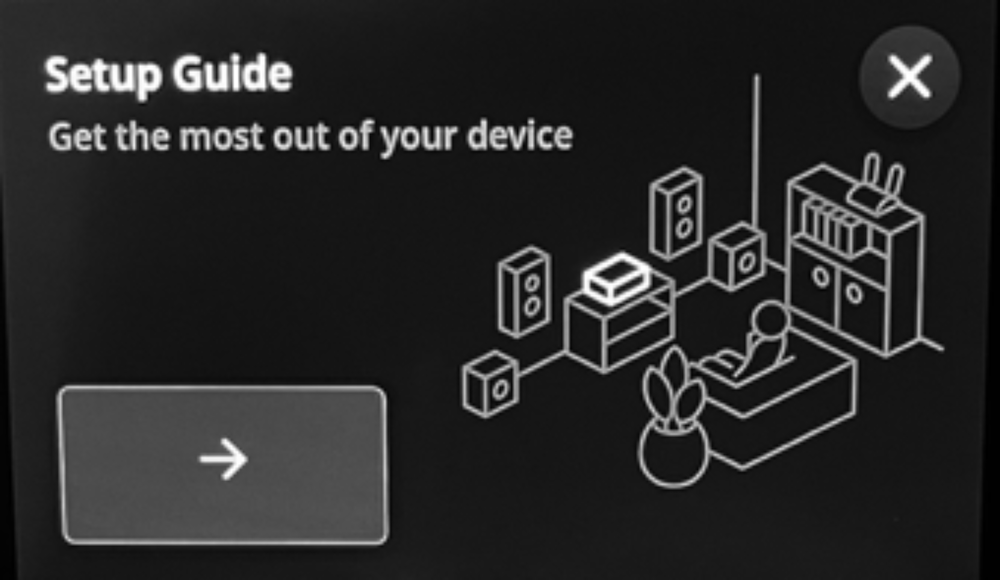
Setup Through the Touchscreen Display
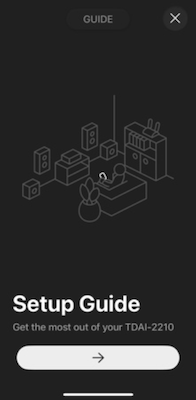
When the TDAI-2210 is switched on for the first time, the display will automatically guide you through the Setup Guide.
The Setup Guide will offer you to add the TDAI-2210 to your network either over a) Apple Wireless Accessory Configuration, b) Available wireless Network Connections (WLAN), or c) Ethernet Network Connection when the TDAI-2210 is already wired to your router (LAN).
If you don’t want to add the TDAI-2210 to your network, you can tap the white “x” in the top-right corner of the screen and continue the setup without a network connection.
After this setup is completed, tap Finish. Your TDAI-2210 is now ready for use.
Setup Through the “My Lyngdorf” Remote App
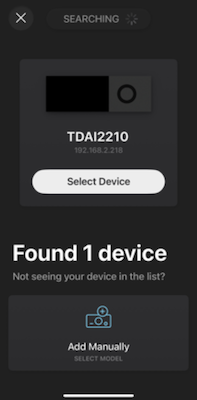
If your TDAI-2210 is connected to your home network using an Ethernet cable (LAN), you will be able to find the TDAI-2210 in the app immediately. Select your TDAI-2210 and proceed with the Setup Guide as shown in the app.
Setup Through the Browser App
If your TDAI-2210 is connected to your home network with an Ethernet cable (LAN), you can use the browser window of your computer, tablet, or smartphone to operate the TDAI-2210. Open the browser on your device, and type in:
tdai2210.local
Alternatively, to access the TDAI-2210 browser app, use the provided remote control, press the Info button, and note the IP address displayed on the screen. Open a browser and type in the IP address.
After the initial setup, please continue and complete the TDAI-2210 setup as on the following pages.
TDAI-2210 Touchscreen
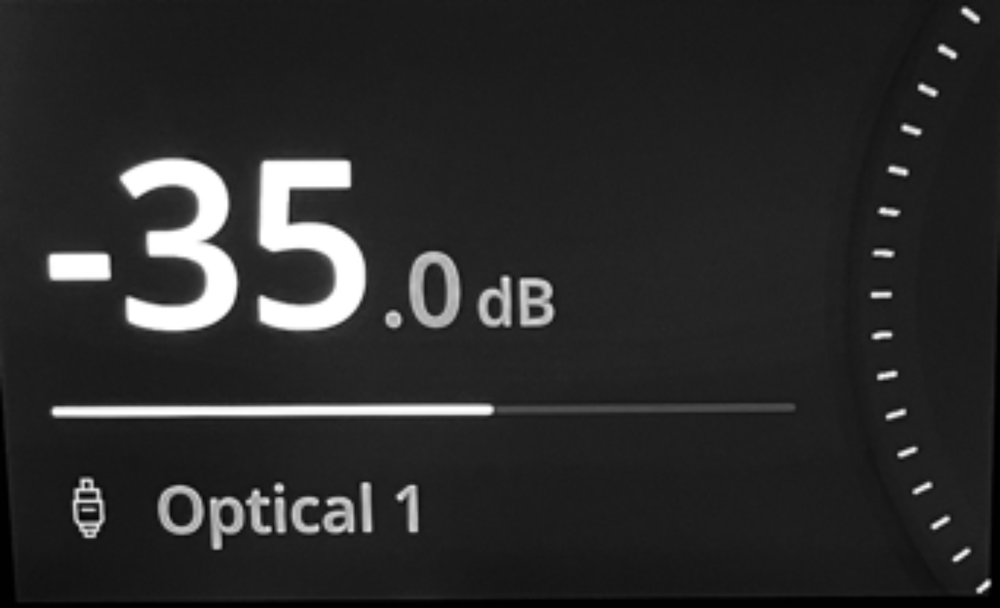
Screensaver
The default screensaver shows the current volume level and the currently chosen input.
The type of screensaver can be changed in the Setup menu.
Main Setup Screen
A tap on the screensaver switches to the main screen and shows further information in one of the menus on the sidebar.
- Home
- Inputs
- Setup

Home
Volume / Mute
The number indicates the volume level in dB, ranging from -99 dB (quiet) to 0 dB (default maximum level) and +20 dB.
The maximum volume level can be limited in the Setup menu, for example, to prevent too loud listening levels.
A tap on the volume level mutes the signal. The next tap unmutes the signal.
Note: In recording studios and digital audio, 0 dB marks the full signal. Negative -dB numbers represent a reduction in signal down to the minimum, while positive +dB numbers mean additional gain is applied.
Voicing
The chosen sound Voicing is named and visualised by the Voicing line.
A tap on the Voicing line opens the Voicing menu, allowing you to select, change, or add a Voicing.
Controls
Controls show the chosen tone controls for Bass, Treble, and Balance.
A tap on Controls opens the tone control menu. Set the desired sound and confirm.
RoomPerfect
RoomPerfect™ displays the currently selected listening mode, allows you to run the RoomPerfect™ setup guide, or changes the RoomPerfect™ listening mode between Bypass, Focus, and Global.
Inputs
Input
Tap Input to display all available inputs by name and icon, along with the currently selected input at the top left.
Radio
Tap Radio to show the radio menu. Scroll or search and tap a radio station to play it.
Podcasts
Tap Podcasts to show the podcast menu. Scroll or search and tap a podcast to play it.
Storage
Tap Storage to access local storage, such as a USB drive, and play music files directly.
If no storage device is connected, or the device or files cannot be read, no information is shown.
Setup menu
Device
- Name
-
Name to set an individual name for your TDAI-2210.
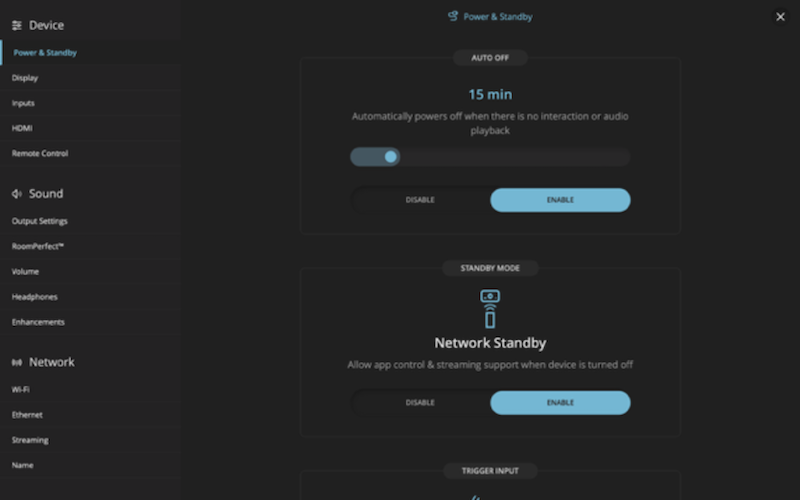
- Power & Standby
-
Tap Power & Standby to set the time to standby, the Network standby mode, and the Trigger input.
- Display
-
Tap Display to set the brightness, select the screensaver and the display type.
- Theme
-
Tap Theme to set the display theme. Dynamic colour and dark screen or light screen can be set.
- Inputs
-
Inputs can be disabled, enabled, renamed, and customised.
- HDMI
-
Tap HDMI to change the HDMI CEC settings.
- Remote Control
-
Tap Remote Control to enable or disable the infrared (IR) receiver for remote controls.
Sound menu
- Volume
-
Tap Volume to set a maximum volume level and a default volume level.
- RoomPerfect
-
Tap RoomPerfect to enter the RoomPerfect™ menu.
- Output Settings
-
Tap Output Settings to set the main speaker outputs, analogue pre-outputs, and the digital output.
- Headphones
-
Tap Headphones to enter the headphones menu.
- Polarity Inversion
-
Tap Polarity Inversion to set the polarity of the left and right channels.
- Enhancements
-
Tap Enhancements to configure the ICC (Intersample Clipping Correction) and the Subsonic filter.
Network menu
- Wi-Fi
-
Tap Wi-Fi to show the connection to an existing Wi-Fi network.
- Ethernet
-
Tap Ethernet to show the connection to an existing wired network (requires network cable)
- Streaming
-
Tap Streaming to set how external music streaming players can control the TDAI-2210
Software
- Updates
-
Tap Updates to display software update options and update the device’s firmware.
- Data
-
Tap Data to create or restore a backup using an attached USB storage device.
- System
-
Tap System to reboot the TDAI-2210, reset the user interface, or perform a full factory reset.
Device: Inputs Setting
You can edit and customise the settings for each input.
Hide Input
You can disable unused inputs to limit the number of shown inputs in the list.
Tap Hide Input to disable an input.
All disabled inputs are shown under Disabled inputs, and can be activated by pressing Enable Input.
Change Name
Tap Change Name to change the name of an input. Use this feature to indicate the connected equipment. For example, rename the HDMI input to the name of the device (i.e. “Sony” or “Apple TV”), or rename the analogue input (i.e. “Vinyl” or “Tape”).
Icon
Tap Icon to change the icon shown for a specific input. For example, use a Projector symbol for the HDMI port, or a Cassette symbol for the analogue input.
Voicing
You can assign a default Voicing to each input.
No Change will always keep the currently set Voicing when this input is selected.
Choosing a Voicing from the list will activate that Voicing whenever this input is selected.
Note: See the section about designing Voicings in this manual.
Lipsync
You can set an audio delay time between 0 and 500 milliseconds (ms) to ensure that the video and audio signals are played back simultaneously. The correct delay must be found by watching a lip-sync-critical scene.
Sensitivity
Enables you to match the volume levels between inputs. If an audio source has a lower output gain (lower volume level), increase the sensitivity of this input up to +24dB.
Home Theater
Turns the amplifier into a power amplifier when using this input. This feature bypasses the volume control when the input is selected, and the TDAI-2210 plays at the maximum volume level.
When switching back to other inputs, the TDAI-2210 returns to the last current volume level.
Warning:
Home Theater mode bypasses the volume control and sets it to maximum level. Do NOT choose this setting with an unregulated signal or any audio source without volume control (for example, a CD Player)! The amplifier will get very hot. Ensure the TDAI-2210 has sufficient ventilation.
This feature might be selected if you are using the TDAI-2210 in a home theatre setup where it is used to power and calibrate the front speakers and/or subwoofer. Connect your home theatre processor to the selected input port.
Sound: Volume Settings
Maximum Volume
The maximum volume setting is a safety precaution that limits the maximum volume that can be achieved by spinning the wheel or increasing volume via the remote. This can be set to protect your loudspeakers against overload.
Default Volume
The default volume setting controls the default volume when the TDAI-2210 is switched on.
Sound: RoomPerfect™
Introduction to RoomPerfect™
RoomPerfect™ is designed to analyse and correct for the negative effects that the listening room has on the speaker’s sound.
It is very challenging to design a perfect listening environment with a symmetrical setup and an ideal reverberation time, especially without vibrating surfaces like windows. A traditional speaker setup requires uneven distances to the back and side walls to avoid reflections arriving at the listening position simultaneously, as this would have a negative effect on the frequency response. Having strong reflections after each other will cause “smearing” of the sound and reduce the overall dynamic performance.
Focus position
The focus filter improves the sound quality at a specific listening position. This makes the focus filter the best solution for optimal sound quality at a single listening position. A total of 8 focus positions can be stored after the initial calibration.
Global filter
The global filter enhances sound quality throughout the entire room. When moving around a room, the global filter yields the best results.
Note: For more detailed information, FAQs, and videos about RoomPerfect, please visit our website.
How to Set Up RoomPerfect™
Note: The RoomPerfect™ microphone is a highly sensitive and finely calibrated device which must be treated with utmost care. If the microphone has been dropped on the floor, it may be damaged. If this is the case, obtain a new microphone from your Lyngdorf Audio representative before performing the system calibration.
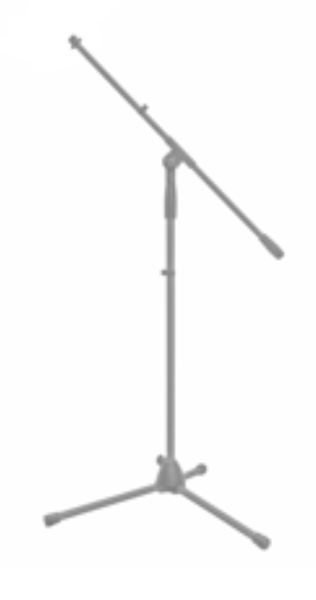
RoomPerfect™ Preparations
Place the RoomPerfect™ calibration microphone on the stand. Be sure to fasten the screws properly so the microphone does not move during a measurement.
Plug the supplied microphone cable into the microphone.
Connect the microphone cable to the TDAI-2210 using the included mini-jack connector.
Placing the Microphone in the Focus Position
When prompted to place the microphone in the focus position, connect the microphone to the microphone input on the front of the TDAI-2210 and position the microphone, using the microphone stand, in your primary listening position. The height and the orientation of the microphone should correspond to your head’s height and direction.
Volume Setting
Press Enter, and a test signal will start from the left speaker. The system will give an estimated optimal volume for calibrating the system, or will accept the current volume. Adjust the volume if required by the system and retry the measurement.
The calibration volume should not be so loud that it is inconvenient to you or causes damage to your loudspeakers. If this is the case, set it to a lower and more appropriate level. A low volume can result in a longer calibration time or a measurement time-out. A low volume and long measurement will not affect the quality of the result.
If the system continues to require a higher signal level, the problem could be a defective adaptor, cable or microphone.
Measuring the Focus Position
When the calibration volume has been set, RoomPerfect™ will send a range of pure tones to measure the focus position. If there is noise in the room, the measurement may take longer to complete. This will not affect the quality of the result.
Measuring Random Room Positions
When the focus position has been measured, the next step is to measure the acoustical properties of the room. It is essential to perform well-spaced measurements to obtain a comprehensive image of the room’s acoustical properties. See RoomPerfect™ troubleshooting if the measurement stops prematurely.
Keep taking measurements until RoomKnowledge reaches 90%.
Note: RoomKnowledge refers to the level of new information in the last measurement. If there is little new information, the system will interpret it as meaning it knows nearly everything. When the RoomKnowledge does not increase after a measurement, this means that the measurement provided a lot of new information to the calibration!
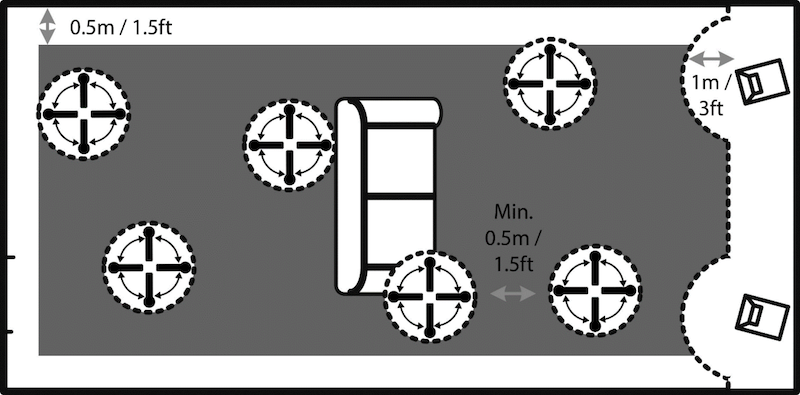
These are the guidelines when measuring the room:
The microphone should be in random and varying positions, heights, and orientations.
Point the microphone up/down/sideways – the more random positions the better.
The measurements should cover the primary listening area.
Do not take measurements behind plants, furniture, etc.
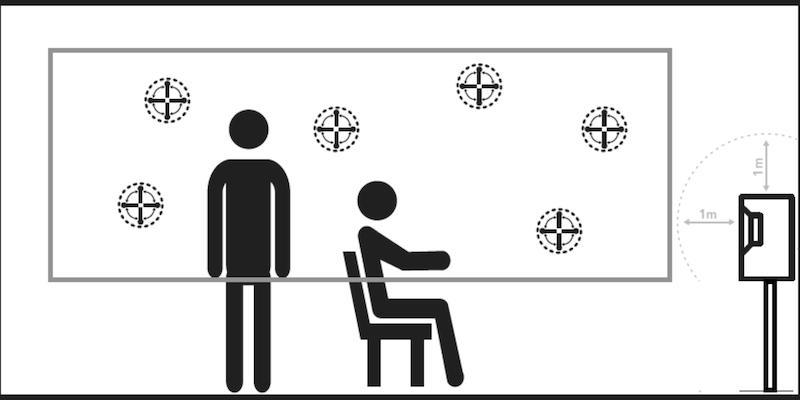
The microphone should not be closer than 0.5m/1.5ft from the floor, ceiling, and walls.
The microphone should be at least 1m/3ft from the front of the loudspeakers.
There should be at least 50cm/1.5ft between each measurement.
Do not take symmetrical measurements in the room.
To fully optimise the system’s understanding of the room’s acoustical properties, we recommend you continue taking measurements until the RoomKnowledge is above 95%. The higher the RoomKnowledge, the more accurate the room correction filters will be.
Note: The RoomKnowledge is calculated from the amount of NEW information in the measurement compared to the data already stored. It is therefore the target to have as SLOW an increase in RoomKnowledge as possible.
Calculation of Focus and Global Filters
Once the room measurements are complete, the system will automatically calculate the focus and global filters.
Note: We recommend saving a Backup of TDAI-2210 settings after performing a RoomPerfect™ calibration (see “Manage Software” in the Setup section).
Sound: Output Settings
The Output setup allows you to select and customise speakers and woofers, and to set up the analogue and digital pre-outs.
The frequency graphics and connections diagrams on the touchscreen or in the app will help you to find the right crossovers, EQ, and levels.
Warning:
Both the + and – speaker outputs of the TDAI-2210 carry voltage.
Never run the TDAI-2210 in Bridge Mode with another amplifier!
Never connect the speaker outputs to the high-level inputs of a subwoofer amplifier!
Setup
The Setup menu offers three different options:
Standard
Custom
Preamp
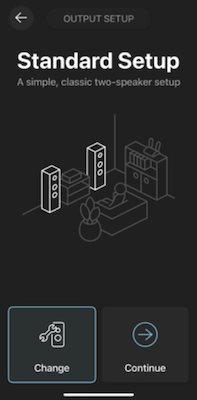
Standard
Standard is for a classic 2-channel stereo setup with two loudspeakers, left and right.
Select Generic for any kind or brand of loudspeaker.
Select one of the Lyngdorf speaker models to optimise the sound performance. This will add an equalising filter designed for the selected speaker.
Custom
Custom is for speaker-subwoofer systems and other individual speaker setups.
Select Generic for any kind or brand of loudspeaker.
Select one of the Lyngdorf speaker models to optimise the sound performance with an equalising filter designed for this speaker when used together with the subwoofer chosen next.
Select No Subwoofers if you are only using two loudspeakers.
Select Custom Subwoofers if you are using 1 or 2 Subwoofers together with the loudspeakers. Next, select how the subwoofer is amplified by selecting Generic Amplifier or choosing one of the Lyngdorf amplifiers. Next, select the connection method you have used for the amplifier, such as RCA, XLR, or Digital. Next, set a crossover frequency between speakers and subwoofers.
Note: The default crossover frequency is 80 Hz. It can be changed in the following steps. The ideal frequency is determined by the frequency response of the loudspeakers and the subwoofer’s frequency response.
Preamp
Preamp is for using the TDAI-2210 as a pre-amplifier, music streamer, or RoomPerfect™ processor.
Note: The power amp section (speaker outputs) will be disabled when using the TDAI-2210 in Preamp mode.
You can set the analogue output and the digital output individually to match your system as follows:
- Output Off
-
Output is not used. No signal at the output.
- Full Range
-
Provides the complete frequency signal with volume regulation, tone controls, Voicings, and RoomPerfect™ calibration.
- Low Pass
-
Provides only lower frequencies with volume regulation, tone controls, Voicings, and RoomPerfect™ calibration.
- High Pass
-
Provides only higher frequencies with volume regulation, tone controls, Voicings, and RoomPerfect™ calibrated.
- Tape Out / Line Out
-
Provides the complete frequency signal with no volume regulation (full signal level), no tone controls, no Voicings, no RoomPerfect™ calibration.
- Headphone Amplifier
-
Provides the complete frequency signal with no volume regulation (full signal level), tone controls, Voicings, and no RoomPerfect™ calibration.
Distance
When a speaker-subwoofer system is set, Distance allows for aligning different distances of speakers and woofers in relation to the listening position.
Measure the distance between the primary listening position (listener’s head) and the front of the left and right speakers, and type in the number in cm or inches.
Measure the distance between the primary listening position (listener’s head) and the back corner of the subwoofer, and type in the number in cm or inches.
The difference will then be automatically aligned in the DSP (Digital Signal Processor), so that speakers and woofers integrate as well as possible.
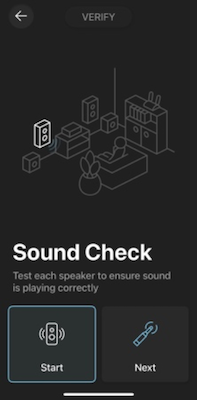
Verify
Use Verify to check whether all speakers and woofers are set up and connected correctly.
This function will first play a signal on the left speaker, then on the right speaker, and then on the woofers (if configured).
Increase the volume level so that you can clearly hear the signal, then verify and compare all channels.
If you miss one signal, first check all connections and wires. Second, check whether the selected speaker setup and woofer setup in the Output menu match your actual speaker system.
Main menu
The Main output menu sets the crossover, level, and sound EQ for the main speakers.
Crossover
Routing
Full-range: Allows the incoming signal to pass unfiltered.
High pass: Removes frequencies below the crossover frequency, allowing high frequencies to pass.
Low pass: Removes frequencies above the crossover frequency, allowing low frequencies to pass.
Frequency
The number sets the crossover frequency for the routing in Hertz.
The ideal frequency is determined by the frequency response of the loudspeakers and the subwoofer’s frequency response. For traditional setups, the frequency should be the same for both Main and Preout outputs.
Filter
LR 2nd, 4th or 8th order.
BW 1st, 2nd or 4th order.
The references “LR” and “BW” refer to the inventors of modern crossover designs, Linkwitz-Riley and Butterworth. The filter order refers to how the high-pass and low-pass outputs interact with each other, as well as the steepness of the filter curve. The curve shown in the app or touchscreen will indicate the characteristic.
Level
Reduce the signal level for the main speaker output by up to 24 dB to match the level of the pre-output.
Speaker EQ
You can select any of the built-in equaliser filters or choose “Custom” to design your own filter and optimise the sound from your speakers.
A custom speaker EQ is optional and only required if your speaker lacks internal crossover filters or if you wish to modify the sound of your speakers.
Advanced: Analogue Out and Digital Out
The Analogue and Digital output menu sets the crossover filter, level, amp delay, signal, and sound EQ for the analogue or digital pre-out. The default setting for the analogue and digital output is Off.
Crossover
Full Range: allows the signal to pass unfiltered.
High pass: Removes frequencies below the crossover frequency, allowing high frequencies to pass.
Low pass: Removes frequencies above the crossover frequency, allowing low frequencies to pass.
Frequency
The number sets the crossover frequency for the routing in Hz.
The ideal frequency is determined by the frequency response of the loudspeakers and the subwoofer’s frequency response. For traditional setups, the frequency should be the same for both the Main and Pre-out outputs.
Filter
LR 2nd, 4th or 8th order.
BW 1st, 2nd or 4th order.
“LR” and “BW” refer to the inventors of common crossover designs, Linkwitz Riley and Butterworth. The filter order refers to how the high-pass and low-pass outputs interact with each other, as well as the steepness of the filter curve. The curve shown in the app or touchscreen will indicate the characteristic.
Level
Level reduces the signal level for the main speaker output by up to 24 dB to match the levels of the pre output.
Amp Delay
Amp Delay takes care of the signal delay (latency) of external amplifiers.
For example, if you have an active subwoofer with internal signal processing (DSP) or a separate Amplifier with internal A/D or D/A conversion, there may be an electronic signal delay in these products.
Request the internal signal delay (latency) in milliseconds (ms) of the connected amplifier, active subwoofer, or DSP from the manufacturer, and type in the number in Amp Delay. This will time-align the main speakers with the pre-out, leading to better sound integration.
Level Control
- Full scale
-
The pre-out gives the full signal level from the audio source, independent of the volume control.
- Regulated
-
The pre-out follows the volume control level set for the main speaker outputs.
Signal Output
- Mono
-
The pre-out will provide a mono signal.
- Stereo
-
The pre-out will provide a stereo signal.
Speaker EQ
You can select any of the built-in equaliser filters or choose “Custom” to design your own filter and optimise the sound from your speakers or subwoofer.
Advanced: 2nd Speaker Setup
Add a 2nd Speaker Setup
Here you have the option to store a second speaker setup. This will allow you to test another speaker setup or to store and keep two calibrated setups for general use – for example, with and without a subwoofer.
Enabling this will initiate the Guided Speaker Setup and RoomPerfect™ calibration for the second speaker setup.
Once complete, the Speaker Setup menu item will be available in the main menu, enabling you to switch between the two setups easily.
Tips for Setting Up Speakers
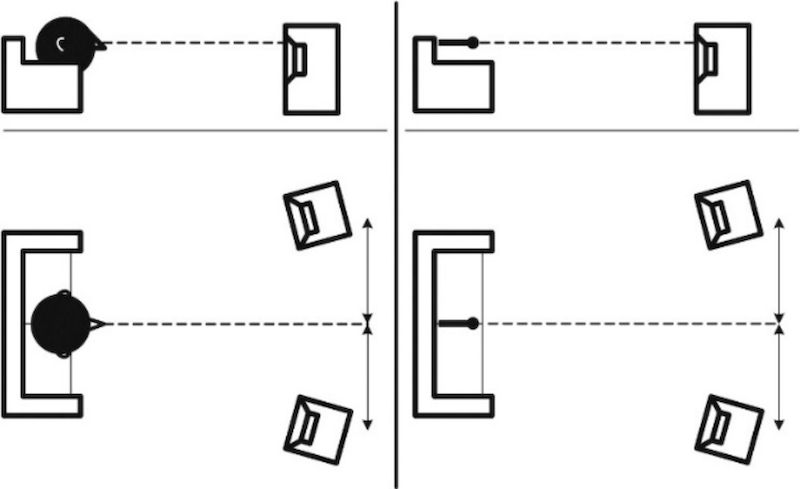
Stereo Triangle
You can use the stereo triangle as a good rule of thumb when determining where to place your speakers. The distance between the speakers should be the same as the distance from your listening position to both speakers.
Tip: You can reduce reflections from the hard floors and hard surface walls by positioning a carpet, painting, a bookshelf, or other furnishings between you and the speakers. These objects act as diffusers.
Find the position of the diffusers by having someone hold a mirror flat against the wall or floor. When you can see the speaker in the mirror from the listening position, you have found the optimal position for the diffuser.
Speaker Placement / Traditional Box Speakers
For an optimal listening experience with a RoomPerfect™ calibration, we recommend placing your speakers against the wall, opposite your preferred listening position. This will ensure that the wall reflection and the direct sound reach your ears simultaneously, giving you perfect timing and impulse response.
If your speakers have a bass-reflex port on the back, allow a 5 cm / 2 inches clearance to the back wall. This will ensure that there is no disruption to the port’s functionality.
Subwoofer Placement
With a single subwoofer, we recommend placing the subwoofer against the wall between the main speakers.
With two subwoofers, position one in each front corner, aligned with the main speakers.
Note: As the TDAI-2210 now controls the Phase, Cut-Off Frequency, and Level, you should set the controls of the connected subwoofer(s) to neutral:
- Phase: 0,
- Cut-Off: Maximum, and
- Level at 50% of maximum.
When connecting the Lyngdorf boundary woofers, you should connect the analogue outputs to the BYPASS input of the woofer.
Measuring Distances
When measuring the distance to your main speakers, measure from the preferred listening position (the focus position) to the front of the speakers.
When measuring the distance to a subwoofer, measure from the preferred listening position to the back corner of the subwoofer.
Note: Always perform a new RoomPerfect™ calibration when you have changed speaker or subwoofer placement, or changed settings in the Output setup.
Sound: Headphones
Startup sets a default volume level.
Max limits the maximum volume level, for example, to prevent high levels from damaging the headphones.
Mute at power on if headphones are connected. This function allows you to control whether the headphone connector should control the mute function on your speakers.
Sound: Polarity Inversion
Polarity inversion is equal to changing + and – on the cables to the loudspeakers. You can do this individually for each speaker.
Sound: Enhancements
ICC (Intersample Clipping Correction)
Can be set to enabled or disabled.
Digital audio tracks typically exceed 0 dBFS (decibels relative to full scale), which means they will be clipped when upsampled or otherwise processed in the audio chain, resulting in distortion.
With ICC enabled, the TDAI-2210 will dynamically provide extra headroom to prevent clipping during the processing of the audio signal.
Changing inputs or going into standby mode will reset the ICC level.
Subsonic Filter
The subsonic filter can be set to enabled or disabled.
A subsonic filter, also known as a rumble filter, is a high-pass filter that cuts frequencies below 20 Hz. It can be used to prevent a turntable and the woofers or subwoofers from influencing each other.
For example, LPs can have warps which cause the woofer to have a large excursion in the subsonic frequencies below 20 Hz. Turntable placement, room vibrations, and floor vibrations can cause a similar effect.
Since frequencies below 20 Hz are not easily audible, activating the subsonic filter can prevent excessive woofer excursion, reduce distortion, increase amplifier efficiency, and enhance overall sound performance.
Network menu
Wi-Fi (Wireless connection)
View the Wi-Fi status or set up a new connection by scanning for nearby networks.
Ethernet
Shows the IP addresses and MAC address of the TDAI-2210.
Enter this IP address in a browser to see the amplifier’s setup menu.
Allows for setting a Static IP address instead of the default DHCP (Dynamic)
Streaming
In the Streaming menu, you can configure the basic setup of the music streaming:
Streaming players can control volume: Set to Active or Inactive.
Streaming players can change input source: Set to Active or Inactive.
Streaming players can power on the device from standby mode: Set to Active or Inactive.
Password sets a password to restrict access to AirPlay streaming
Software
Updates
In this menu, you will see the current software version on the TDAI-2210 and show an update, if available.
Note: If the web interface is inaccessible or a fault in the update process has rendered the amplifier inaccessible, you can force a new software update onto the TDAI-2210.
Forced Software Update
Save the new software on a FAT-formatted USB drive.
Insert the USB drive into the “SW Update” connector on the back of the TDAI-2210.
Turn off the TDAI-2210 by disconnecting the mains power on the back of the device.
Hold down the standby button on the front and connect the mains power again.
When the Lyngdorf logo starts flashing, release the standby button, and the TDAI-2210 will update the software. When the update is complete, the amplifier enters standby mode.
Data
Backup
When a USB device is inserted into the connector on the rear of the TDAI-2210, this menu allows you to store a complete backup of settings, including the RoomPerfect™ calibration. This will enable you to restore the amplifier to this specific setup at a later date.
Note: You can store several Backups. Ensure you enter distinct backup file names to differentiate between versions.
Restore
If a backup file is available on a USB medium, you can select and load it.
System
Reboot
Sets the TDAI-2210 to standby mode and then restarts it. This process closes all running programs and resets the system to its last state and settings.
Reset UI
Resets the user interface, screen and cache to default settings.
Factory Reset
Shuts down the system and returns to default factory settings.
Warning: All user preference settings, system data, and RoomPerfect™ data are lost when restoring to default settings! To keep the settings, choose Reboot.
The Factory reset is also possible over the front panel. If you press and hold the Standby button for more than five seconds and then release it, the TDAI-2210 will initiate a factory reset.
If you have pressed the Standby button for more than five seconds by mistake, you can avoid the factory reset by holding the Standby button for an additional five seconds. This will skip the factory reset initiation.
Voicings: How to select and set up Voicings
A Voicing is a sound-equalising filter that can be activated to amplify or attenuate certain frequencies according to your personal preferences. A Voicing can be set for the TDAI-2210 in general, and assigned to each input individually, for example, emphasise bass on one input without sacrificing neutrality on others.
Voicings
The TDAI-2210 comes with 14 Voicing presets.
The names and the shown equalising curves indicate the sound character.
- Neutral
-
Default Voicing with no change in tonal balance.
- Music
-
Dampens the midrange to compensate for recordings that would otherwise sound too harsh.
- Music 2
-
Further dampens the midrange and removes harshness.
- Relaxed
-
Dampens the low and midrange frequencies.
- Open
-
Dampens the low frequencies.
- Open Air
-
Further dampens the low frequencies.
- Soft
-
Dampens upper tones slightly, making bright tracks warmer and more balanced.
- Action 1
-
Enhances the lower frequencies.
- Action 2
-
Further enhances the lower frequencies.
- Movie
-
Dampens the high frequencies.
- Action Movie
-
Enhances the lower frequencies and dampens the high-range frequencies.
- News
-
Cuts low frequencies for live broadcasting, sports, and news, while improving speech intelligibility.
- Bass 1
-
Enhances the lower frequencies and dampens the midrange to compensate for recordings that would otherwise sound too harsh.
- Bass 2
-
Further enhances the lower frequencies and dampens the midrange to remove harshness.
Creating Custom Voicings
A Voicing can combine up to eight filter sections. For each section, you can choose from various filter designs, which, when combined, will provide the total correction of the Voicing.
For each Voicing, you will see a green line showing the total correction, as well as a blue line showing the correction caused by the selected filter section. If there is only one active filter section, only the blue line is shown. You can choose between the following filter designs:
- Low Pass
-
Functions as a crossover filter, reducing the signal above the frequency.
- High Pass
-
Functions as a crossover filter, reducing the signal below the frequency.
- Low Shelf
-
Attenuates the lower frequencies to a specified level.
- High Shelf
-
Attenuates the higher frequencies to a specified level.
- Parametric
-
Attenuates a specific frequency.
All these filters can have either positive or negative gain, effectively reversing the filter’s effect.
You can adjust the Overall gain for each Voicing to switch between Voicings without experiencing a change in perceived volume level.
Try experimenting by creating your own Voicings and testing the functionality of the different filter sections.
Exporting and Importing Voicings
It is possible to download single Voicings to a file and to add new Voicings by uploading those files as well.
This will enable copying a Voicing from one device to another. The file format is identical for all enabled Lyngdorf products, so if you have a Voicing you like on your TDAI-2210 amplifier, it is possible to add that to your Lyngdorf multichannel processor or vice versa.
You can also download and upload an entire set of Voicings. Again, these files will work on all devices that support this feature.
Note:
Uploading a set of Voicings with this feature will replace all Voicings in the amplifier.
Single Voicing files have the extension single_voicing.xml, and this must not be changed.
Editing or deleting Voicings
The Voicings dropdown list contains all the Voicings currently stored in the amplifier. Selecting a Voicing in the list will allow you to delete or edit the selected Voicing (this will open the Voicing editor).
Adding a new Voicing
To create a new custom Voicing using the Voicing editor, enter the name of your new Voicing and tap Add.
To add a Voicing from a single_voicing.xml file, browse for the file and then tap Add.
Replacing all Voicings from file
This functionality replaces all Voicings in the amplifier with a new set from a voicings.xml file.
Please note that this will overwrite all Voicings currently stored in the amplifier. Click “Browse” to find the voicings.xml file you wish to upload, and then tap Apply to use it.
At the bottom of the page, you will find a link to download the current set of Voicings in the amplifier to a voicings.xml file.
To view the details for a stored Voicing, select it and tap Edit. You can also delete the stored Voicings and add new designs here.
Music Streaming Services
Google Cast
Google Cast is a feature that lets you stream your favourite music from your phone, tablet or laptop right to your speakers. Easily control your speakers with apps you already know and love from your Android phone or tablet, iPhone®, iPad®, Mac® or Windows® laptop, or Chromebook.
Please use your Google Home application to accept Google Terms of Service and Google Privacy Policy.
https://policies.google.com/privacy?hl=en
Google, Android, Google Cast, and other marks are trademarks of Google LLC.
Spotify Connect
Use your phone, tablet or computer as a remote control for Spotify. Go to spotify.com/connect to learn how.
The Spotify Software is subject to third-party licenses found here:
https://developer.spotify.com/third-partylicenses#embedded-sdk-third-party-licenses
Tidal Connect
When the TDAI-2210 is connected to your local network, it will be available from your Tidal Connect-enabled devices in the Tidal app (requires a Tidal account). To read more about Tidal services, go to:
Qobuz Connect
When the TDAI-2210 is connected to your local network, it will be available from your Qobuz Connect-enabled devices in the Qobuz app (requires a Qobuz account). To read more about Qobuz services, go to:
Roon
Use your Roon control app to initiate the streaming process. To read more about Roon services, go to:
UPnP
This function allows you to select and play music files in UPnP-enabled libraries on your local network.
You may experience issues accessing files, as UPnP is a set of protocols rather than a defined standard. The implementation of UPnP is therefore not always fully functional for media playback.
USB storage
This function allows you to select and play music files on attached USB devices and flash memory (requires FAT32 format). Use the Storage input icon to access the folders.
airable
This function allows you to access Internet radio stations and podcasts around the world. You can search for stations and podcasts by referencing their genre or geographical location. When a station or podcast is playing, you can assign it to one of the 10 presets. They will appear as a new input for direct selection.
AirPlay2
The TDAI-2210 has native support for multi-room applications under Apple AirPlay. Use your iOS device to initiate individual or simultaneous AirPlay streaming to all TDAI-2210 amplifiers in your setup. https://apple.com/airplay/
Bluetooth (BLE)
Select the Bluetooth input, and the TDAI-2210 can be found in the Bluetooth settings of your other devices.
Music Streaming Formats and Codecs
Overview of supported formats and codecs for the streaming player (stereo only)
- AAC
-
64 kbps; 128 kbps; 256 kbps; 320 kbps
- AIFF
-
44.1 kHz, 16 bit; 48 kHz, 16 bit; 88.2 kHz, 16 bit; 96 kHz, 16 bit; 192 kHz, 16 bit; 384 kHz, 16 bit
- ALAC
-
44.1 kHz, 16 bit; 44.1 kHz, 24 bit; 48 kHz, 24 bit; 48 kHz, 24 bit; Mono 88.2 kHz, 24 bit; 96 kHz, 24 bit 192 kHz, 24 bit 384 kHz, 32 bit
- FLAC
-
44.1 kHz, 16 bit; 44.1 kHz, 24 bit; 96 kHz, 24 bit; 192 kHz, 16 bit; 192 kHz, 24bit; 384 kHz, 24 bit
- MP3
-
96 kbps, 32 kHz; 128 kbps, 44.1 kHz; 192 kbps, 44.1 kHz; 256 kbps, 44.1 kHz 320 kbps;
44.1 kHz 320 kbps; 48 kHz VBR, 44.1 kHz VBR, 48 kHz
- Ogg Vorbis
-
44.1 kHz 48 kHz 88.2 kHz 96 kHz 192 kHz
- WAV
-
44.1 kHz, 16 bit; 48 kHz, 16 bit; 48 kHz, 24 bit; 88.2 kHz, 24 bit; 96 kHz, 24 bit; 192 kHz, 24 bit; 384 kHz, 24 bit
- WMA
-
WMA9
HDMI
What is CEC?
Consumer Electronics Control (CEC) is an HDMI feature that allows you to command and control CEC-enabled devices connected through HDMI using a single remote control (for example, adjusting the volume level on the TDAI-2210 utilising the TV’s remote control).
The level of CEC implementation depends on the manufacturer of each product, and even if a device is brand new, not all electronic devices support CEC. As the television is the “CEC master” in an HDMI setup, the CEC implementation of the television will determine what is possible for the entire system.
CEC
Enables and disables CEC (Consumer Electronics Control) over HDMI.
HDMI TV Audio Input
Switches to the selected input upon detecting an HDMI Audio signal
Note:
By default, CEC is not activated on HDMI to comply with stand-by power regulations. CEC functionality only works with the TDAI-2210 set in Network Stand-By.
CEC is marketed by manufacturers under individual names and designed to promote the connection to the same brand sources. (SONY: Bravia Link, Panasonic: Viera Link, etc.)
Technical specifications
- Description
-
2-channel integrated streaming amplifier
- Power rating
-
2 × 210 W RMS (4 Ohm), 2 × 10⁵ W RMS (8 Ohm)
- Standby power consumption
-
< 0.5W
- Dimensions (W × H × D)
-
325 × 102 × 300 mm (including connections)
-
12.8 × 4 × 11.8 inches (including connections)
- Weight
-
4,8 kg / 10,6 lb
- Finish
-
Matte black
For the newest and complete technical specifications, please visit the TDAI-2210 product page on our website https://steinwaylyngdorf.com
Cleaning and maintenance
The TDAI-2210 requires no regular maintenance, except to keep its exterior clean and free from debris. Simply wipe it with a clean, soft cloth. Do not use cleaner or any liquid directly on the product. A small amount of non-abrasive cleaner on the fabric can be used to remove any dirt or fingerprints. Do not use abrasive cleaners or cleaners containing liquid solvents.
Technical assistance
If you have any questions regarding your Lyngdorf product, please contact your nearest Lyngdorf representative or contact Lyngdorf Audio:
SL Audio A/S
Rævevej 3
7800 Skive
Denmark
E-mail: contact@lyngdorf.com
Web: https://steinwaylyngdorf.com
SL AUDIO A/S • RÆVEVEJ 3 • 7800 SKIVE • DENMARK • WWW.STEINWAYLYNGDORF.COM
↻ 2025-09-26