TDAI 3400 Owner’s Manual
About this manual
For the latest version of this manual and further help in your local language please visit https://steinwaylyngdorf.com or contact us at contact@steinwaylyngdorf.com.
Welcome
Congratulations on your purchase of the Lyngdorf Audio TDAI-3400 fully digital amplifier with RoomPerfect™.
With this purchase, you have joined the ranks of an elite group of people who believe that perfect sound is more than a luxury. It’s a requirement. The TDAI-3400 will deliver an audio experience that will far exceed your expectations. We thank you for placing your confidence in Lyngdorf Audio.
This manual will give you an overview of how to set up your system. Please read the manual carefully to better understand the capabilities of your TDAI-3400.
For more in-depth information about the technologies used in Lyngdorf Audio products, please visit https://steinwaylyngdorf.com.
Compliance
WEEE
The European Parliament and the Council of the European Union have issued the Waste Electrical and Electronic Equipment Directive. The purpose of the Directive is to prevent waste of electrical and electronic equipment and to promote reuse, recycling, and other forms of waste recovery. Lyngdorf products and the accessories packed with them are subject to the WEEE Directive. Please dispose of any waste materials in accordance with your local recycling regulations. Products and equipment which must be collected for reuse, recycling, and other forms of recovery are marked with the icon of the crossed-out waste receptacle.
![]()
![]()
FCC
Lyngdorf products and accessories comply with parts 15 and 68 of the FCC rules. Operation is subject to the following two conditions: (1) this device may not cause harmful interference; and (2) this device must accept any interference received, including any interference that may cause undesired operation.
Changes or modifications not expressly approved by the party responsible for compliance could void the user’s authority to operate the equipment. Equipment marketed to a consumer must can comply with the necessary regulations in the configuration in which the equipment is marketed.
Pre-Installation
Please read all material carefully prior to installation. If you need additional assistance, contact your Lyngdorf Audio representative.
Unpacking the Product
Carefully remove the unit and accessory kit from the carton and check for shipping damage. Contact the shipper and your Lyngdorf Audio representative immediately if the unit bears any sign of damage.
Warning:
Never rest the TDAI-3400 on the front, as the volume wheel cannot handle the weight!
Keep the shipping carton and all packing material for future use. If this unit is shipped without the original packing, damage could occur and void the warranty.
Inventory
Check the list below to ensure that all necessary product components have been delivered. Report all discrepancies to your Lyngdorf Audio representative immediately.
- Owner’s manual
- Power cord
- Remote
- Microphone
- Microphone stand
- Microphone cable
- Microphone adaptor (XLR to mini-jack)
Operating Voltage
Lyngdorf Audio products must be connected to the mains power. The TDAI-3400 will not automatically detect the voltage, so check and set the operating voltage on the switch next to the mains plug.
Ventilation Requirements
The TDAI-3400 does not have a built-in fan, nor does it require special measures to ensure proper heat dissipation. It should be placed according to these guidelines:
- It should always have at least one inch / 25mm of free space on all sides.
- It should be placed in an environment free of excessive heat.
Home Automation System Integration
The TDAI-3400 is compatible with home automation systems via the RS232 and network connector on the rear socket panel. The TDAI-3400’s trigger connections can also be programmed for use in a home automation system.
IP Control
Connect the TDAI-3400 to your local network. Pressing the OK button on the remote and toggling through settings, the TDAI-3400 will display the IP address allocated to the TDAI-3400.
Open a TCP connection on port 84 and use the same protocol as on the serial interface. Use Telnet, Putty, or a similar program to open the TCP connection.
Preparing the TDAI-3400 for Mounting in a Rack
The TDAI-3400 processor is equipped from the factory with feet for free-standing placement, but a rackmount is available as optional accessories. (Accessory item number 900008101)

Front Panel
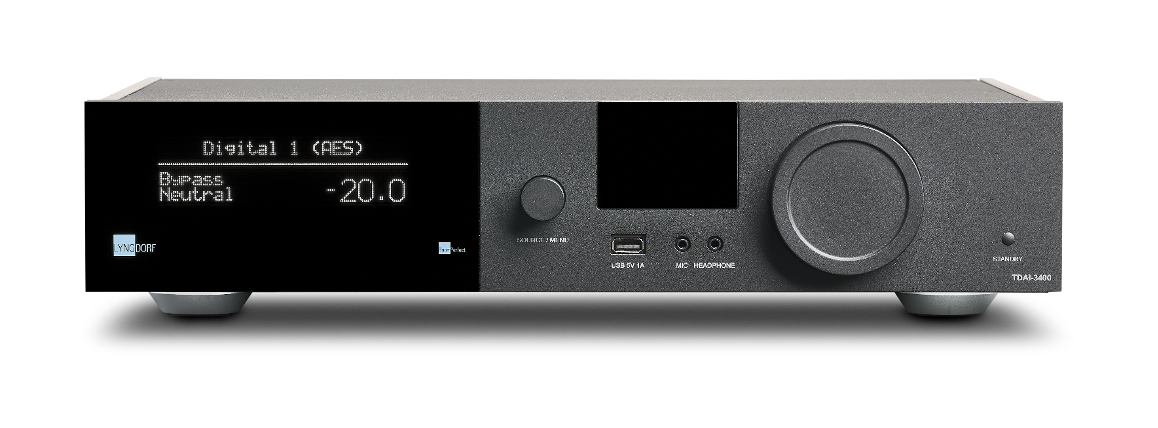
On the front of the TDAI-3400, you will find the display, controls and a few connectors:
Left to Right:
- Display
- Dial for changing source. Long push for entering the menu system.
- Wi-Fi and Bluetooth antennas
- 1 × USB A media input and software update
- 1 × Microphone input for RoomPerfect calibration
- 1 × Headphone output
- Dial for Volume Control
- Stand-By switch
Hot Tips:
When you toggle through Info, you can press “Menu” for revealing a peak meter.
In case the signal through the output stage is clipped, the dot in the volume indication will blink, indicating that your speakers are at risk for overload due to distortion.
Rear Panel
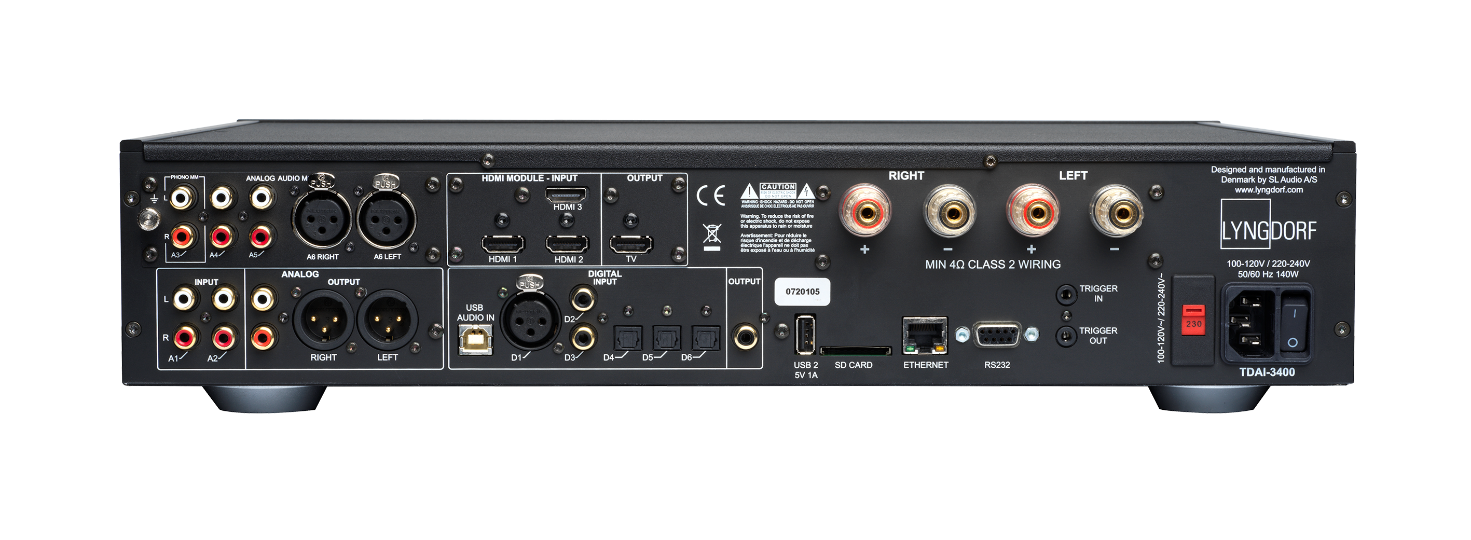
On the back of the TDAI-3400, you will find a range of inputs and output connectors:
Top Row / Left to Right
- Optional Module with 1 × phono (MM), 2 × single ended, and 1 × balanced analog audio inputs
- Optional Module with 1 × TV HDMI output and 3 HDMI inputs, all 4K /HDR compatible
- Speaker Outputs
Low Row / Left to Right
- 2 × single ended analog audio inputs
- 1 × single ended analog audio output
- 1 × balanced analog audio output
- 1 × USB B streaming audio input
- 1 × AES/EBU digital audio input
- 2 × coaxial digital audio inputs
- 3 × optical digital audio inputs
- 1 × coaxial digital audio output
- 1 × USB A connector for music file playback, software updating, etc.
- 1 × SD card slot for storing backup data /SD Card is included
- 1 × RJ45 LAN connector for connection to local network
- 1 × RS-232 connector for serial control of the unit
- 1 × trigger input and 1 × trigger output
- 1 × Main voltage connector with input voltage selector and mains switch
Note:
USB ports require FAT32 formatted drives.
Remote Control

The TDAI-3400 comes with a dedicated remote control, which can operate both with radio frequencies (Bluetooth LFE) and infrared control (IR).
- Display: Changes the read-out on the front display
 : Turn the TDAI-3400 on and into standby
- Info: Reveals information on input signal
- Trim: Adjusts Balance and Bass / Treble levels
- Up/Down:
- Move up and down in menus.
- Browse available settings in a menu.
- Toggles between the available RoomPerfect™ filters.
- Left/Right:
- Move left and right in menus.
- Toggle between neutral and the available voicings.
- Select: Select a menu and store a selected setting.
- Back/Exit: Return to the previous menu.
- Menu: Access the user menu.
 : Turn volume up and down.
 : Mute and restore the sound send to the headphones
 : Mute and restore the sound in the speakers
- SRC +/-: Toggle between active sources.
 : Play/pause the currently playing track in the media player.
 : Skip in the current playlist in the media player.
How to Pair Remote Control in Bluetooth Mode
The TDAI-3400 remote has both an Infrared (IR) and Bluetooth (BT) mode, and the TDAI-3400 will automatically connect to the remote control through Bluetooth. (the indicator on the remote lights up in green)
If Bluetooth operation is problematic for your setup, you can force the TDAI-3400 to use IR connection only by:
- On the remote simultaneously push and hold “Select” and “1”.
- Release the buttons when the red light starts blinking.
Reactivate the Bluetooth connectivity by using “Select” and “2”. The TDAI-3400 will now automatically connect to the remote in Bluetooth mode, and when the remote is operated the green light will appear.
Remote Control Application
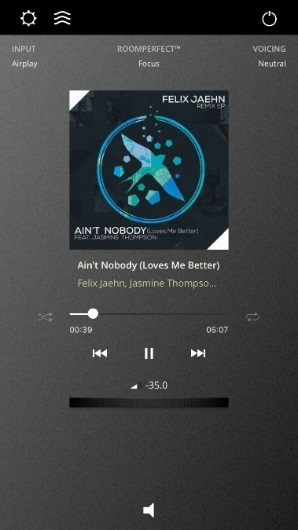
For Android and IOS based phones you will be able to download the Lyngdorf Remote application, which will allow you to handle the operation of your TDAI-3400 – see below examples.
Select input, listening position and voicing directly, and see the signal information in the volume wheel, which you can operate like you operate the volume on the amplifier itself.
Top left icon will access the connection settings for selecting the Lyngdorf product to be controlled, and open for the web interface for accessing the setup. The icon will open the interface for the internal media player and the top left icon will turn the amplifier on or off.
Select input, listening position and voicing directly, and see the signal information in the volume wheel, which you can operate like you operate the volume on the amplifier itself. When using the internal media player album information will appear, when available.
Top left icon will access the connection settings for selecting the Lyngdorf product to be controlled, and open for the web interface for accessing the setup.
The next icon will open the interface for streaming music and the top right icon will turn the amplifier on or off.
Using the vTuner menu will allow you to play all radio stations available on the internet.
Note that through the website you can save up to 5 stations as pre-sets, which then are directly available from the input selector on the front or through the Lyngdorf Remote Application.
Discover the TDAI-3400 setup page
When the TDAI-3400 is connected to your local network you can connect to your TDAI-3400 in different ways:
Use the Lyngdorf remote application to discover the device and enter the homepage. In the setup menu, you will be able to find the network device address and a direct link to the setup page on your internet browser.
If you do not want to install the Remote Control Application, you can type the following in a browser on any device on your network: tdai3400.local.
The homepage will display all the operations, which are available through the Remote App as well as all setup options available through the menu system of the TDAI-3400.
The interface for the media player is available in the bottom section. The advanced bass and treble adjustments are for the overall sound of your system. We will also draw your attention to the pre-equalization available in the output settings, which can be used to correct the sound prior to RoomPerfect™ calibration – and the Voicings available, which can be dedicated to specific sources, like having more bass on Action Movies or decreasing high frequencies on noisy radio stations.
Initial Setup Procedure
Set up the TDAI-3400 integrated amplifier by following these steps:
- Connect the speakers to the Speaker Output connectors.
- Connect all external equipment, audio and video, mains power, etc. to the TDAI-3400.
- If possible, connect the TDAI-3400 to your local network with an ethernet cable.
- Switch on the mains switch on the back of the TDAI-3400.
- The TDAI-3400 will boot the internal computer and go into Stand-By.
- Switch on the TDAI-3400.
- The TDAI-3400 will initially want to connect to your local network
- If connected by network cable (LAN) the TDAI-3400 will automatically connect and display the IP network reference.
For using iPhone or iPad
If no wired network is attached, the TDAI-3400 will want to connect via WIFI – referring to “Apple Wi-Fi Accessory Configuration”.
- Open the Wi-Fi settings on your iPhone/iPad – and you will find the TDAI-3400 under “Setup New Airplay Speaker”.
- Change the device name of your TDAI-3400, press Next, and the TDAI-3400 will copy the Wi-Fi settings from your phone.
For using Android phone or tablet
The TDAI-3400 will establish a soft access point. Type 192.168.110.42 in your browser to access the manual Wi-Fi setup.
Without iPhone/iPad you can manually enter all data or use the WPS function to pair the TDAI-3400 with your Wi-Fi router. (Select WPS and go and press the WPS button on your router)
You can now choose to continue the setup via the display or via web interface (see next page).
- Access the speaker setup guide and verify your setup by selecting your speaker types.
- Settings can be modified later under the Output Menu.
- Access the RoomPerfect™ setup guide and calibrate your speaker setup. See later section.
If you at any point do not want to continue doing setup or calibration, then exit the menu by a long push on the menu button. The TDAI-3400 will now have a basic stereo setup, and you can play music.
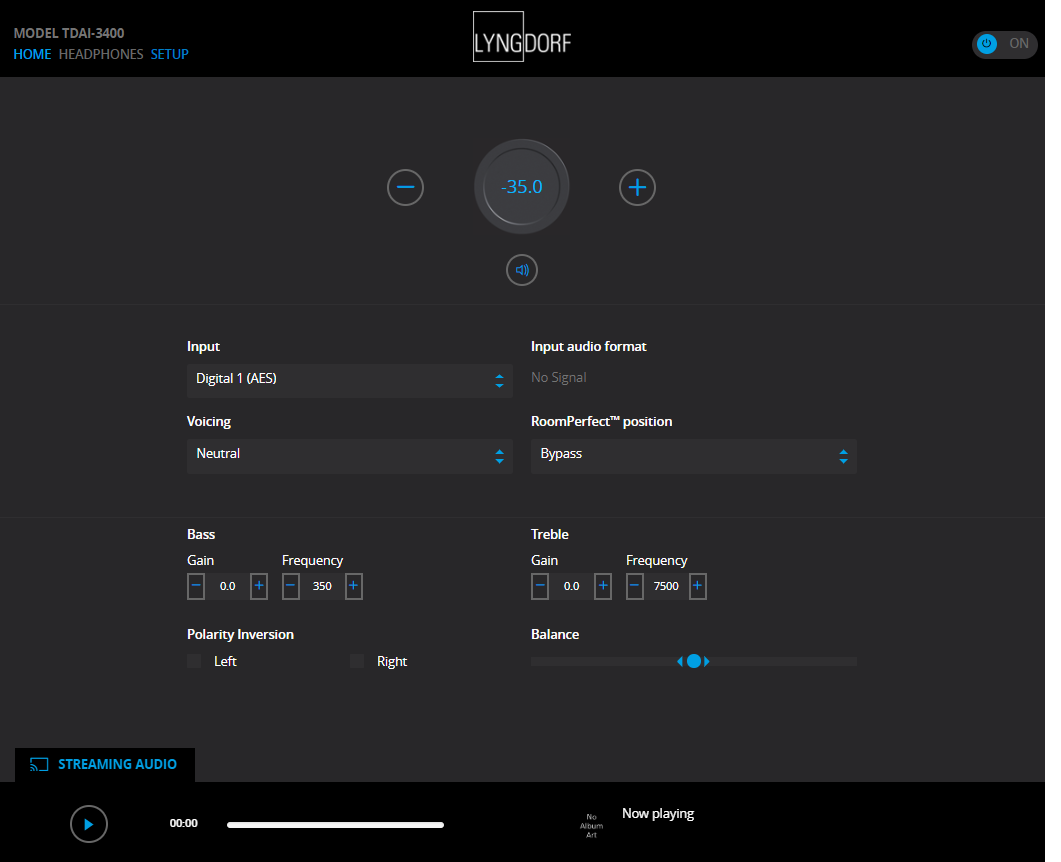
Home Screen / IP Interface
Installation and Operation via IP Interface
With the TDAI-3400 connected to your local network, on the remote press INFO twice to reveal the IP address allocated by the router. Open a browser and write the IP address to access the TDAI-3400.
If you are using an apple product you can also access the device by entering http://tdai3400.local/ in your browser.
As default the TDAI-3400 will use a dynamic IP address. If you want to use a static IP address, you can set this at any time in the Network Setup menu.
If the TDAI-3400 is still in initial setup, you will be guided through the procedure just like on the display operation.
The HOME screen refers to the daily operation as performed with the remote control. The page displays selected input and formats and you can control the volume setting.
The HEADPHONES section can be accessed, when a pair of headphones are connected to the TDAI-3400 on the front panel connector. Here you can adjust volume settings and mute the output.
The SETUP section will be described in the following pages.
The interface for controlling the built-in media streamer is found in the bottom section of this page. For information as to the use of the interface see section for Streaming Setup.
Hot tip: On your mobile device the Home Screen page of your amplifier can be saved as an icon for swift access to operation of the TDAI-3400.
Input Setup
In the Input setup menu, you can adjust the settings for the signal coming from each input.
Input name
You can change the name to refer to the equipment connected to the input.
Enable input
Enables and disables individual inputs so you do not have to scroll through unused inputs.
Enable theater mode
Turns the amplifier into a dedicated power amplifier for the source to this input. This feature bypasses the volume control. This feature might be selected if you are using the TDAI-3400 in a home theater setup where it is used to power and calibrate the front speakers and/or subwoofer. Connect your home theater processor to the selected input. When selecting other inputs, the amplifier returns to the last current volume.
Warning:
Do NOT test this setting with a CD player or similar unregulated signal! In this mode the TDAI-3400 will get very hot, why good ventilation is required!
Sensitivity
Enables you to match the levels of other inputs. Can be adjusted up to +24dB.
Voicing
Select the default voicing. See later section for designing voicings.
Input delay (Lipsync offset)
Set delay time in milliseconds to ensure that the video and audio signals are played back simultaneously.
Preset vTuner station
When selecting vTuner Internet radio stations for presets, they will automatically appear as inputs. (The interface for controlling the built-in media streamer with vTuner is found in the bottom section of the HOME page)
Note:
To save changes, you must press “Save” after making changes to a single input. Do not go to the next input before saving changes.
Output Setup
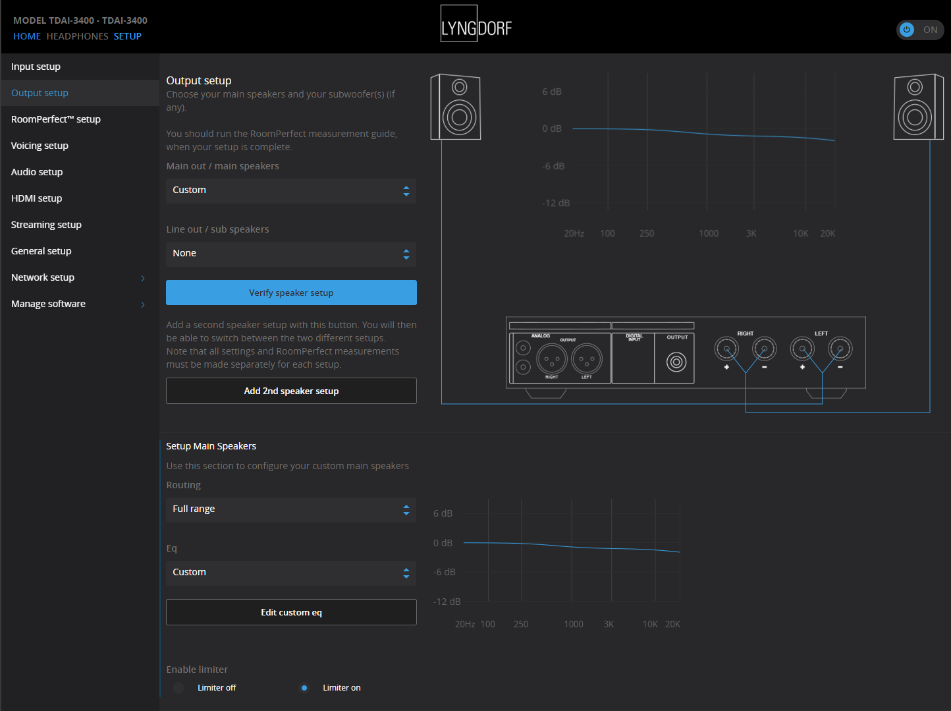
The output setup menu will display the recommended filter settings from the selection of speakers and subwoofer from your initial Guided Speaker Setup. In this section you can change the setup of speaker and line level outputs to your preferences.
Selecting a Lyngdorf speaker will load an equalizing filter designed to optimize the performance of this speaker in relation to the selection of sub speaker selected. Selecting “Custom” will open new settings allowing you to design your own equalizing filter.
In order to reveal all directly controlled features, select CUSTOM speakers and ADVANCED under LINE output selection!
Main speakers
Select the design of speakers connected to the speaker (Main) outputs of the TDAI-3400.
Line out / Sub speakers
Select the design of (Sub-) woofers handling the lower frequencies connected to the analog or digital outputs of the TDAI-3400. Analog and digital outputs can have their individual setup of the output – select ADVANCED for Line out to reveal options.
Add 2nd speaker setup
Here you have the option to store a second speaker setup. This will allow you to test another setup or to store and keep two calibrated setups for general use – example: with and without a subwoofer.
Enabling this will start the Guided Speaker Setup for the 2nd speaker setup. When complete, the menu item Speaker Setup will be available in the main menu, allowing you to easily switch between the two setups.
WARNINGS:
Never run the TDAI-3400 in Bridge Mode with another amplifier!
Never connect speaker cables to High Level Inputs of a subwoofer!
Enable limiter
Normally increasing the volume setting of any amplifier above the nominal specification will allow for higher levels – just with higher distortion levels. Enabling the limiter will ensure that no matter the overall volume setting, the output stage of the TDAI-3400 will never exceed specified distortion levels.
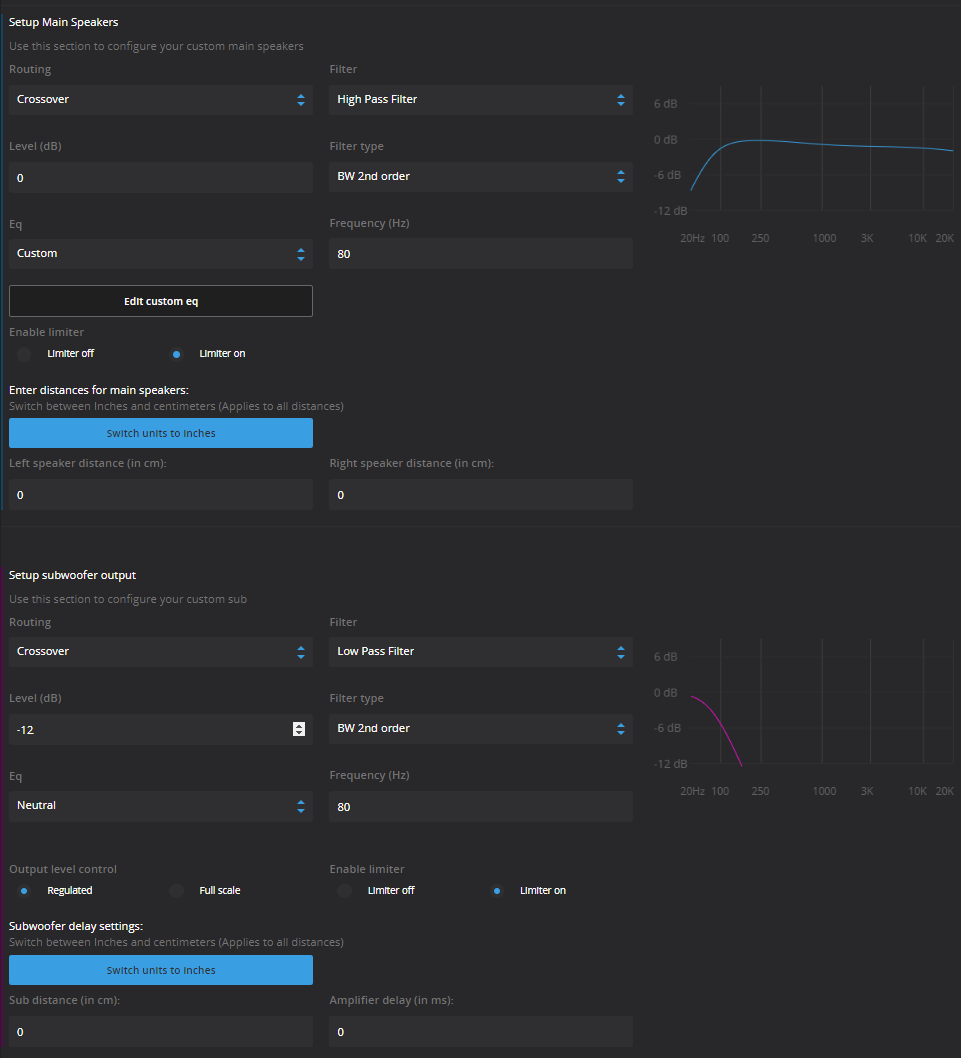
Routing
The available settings are:
- Full range allows the signal to pass unfiltered.
- Crossover will open for other menus for specifying the signal routing
Level
Reduce the signal level for this output with up to 24 dB to match the levels of other output channels.
Eq
Select any of the built-in equalizer filters or select “custom” for designing your own filter to optimize the sound from your speakers. See the chapter Voicings, for input as to the design of filters.
Filter
Sets the type of crossover filter to be applied to this output.
- High pass: Removes the frequencies below the crossover frequency.
- Low pass: Removes the frequencies above the crossover frequency.
Filter Type
Sets the type of crossover to be applied to this output.
- LR: (Linkwitz Riley) 2nd, 4th or 8th order.
- BW: (Butterworth) 1st, 2nd or 4th order.
The references LR and BW refers to the inventors of modern crossover designs. The filter order refers to how the high pass and low pass outputs interact with each other. This subject is too complicated to describe in detail in this manual. We refer to external literature for further information.
Frequency (Hz)
Sets the crossover point for the filter type selected. For traditional setups the frequency should be the same for both Main and Line outputs.
Verify speaker setup
This function will send out a signal to each speaker for verifying the wiring against the chosen setup.
Tips for setting up speakers
Stereo triangle
You can use the stereo triangle as a good rule of thumb when determining where to place your speakers. The distance between the speakers should be the same as the distance from your listening position to both speakers.
Tip: You can reduce reflections from the hard floors and hard surface walls by positioning a carpet, painting, a bookshelf, or other furnishings between you and the speakers. These objects act as diffusers.
Find the position of the diffusers by having someone hold a mirror flat against the wall or floor. When you can see the speaker in the mirror from the listening position, you have found the optimal position for the diffuser.
Speaker placement / Traditional box speakers
For an optimal listening experience with a RoomPerfect™ calibration, we recommend you place your speakers against the wall, opposite from your preferred listening position. This will ensure the wall reflection and the direct sound will reach your ears at the same time, giving you perfect timing.
If your speakers have a bass-reflex port on the back, you should allow for a 5cm/2in clearance to the back wall. This will ensure there is no disruption to the functionality of the port.
Subwoofer placement
With a single subwoofer, we recommend placing the subwoofer against the wall between the main speakers.
With two subwoofers, you should position one in each front corner, in line with the main speakers.
Note:
As the Phase, Cut-Off Freq. and Level is now controlled by the TDAI-3400, you should set the controls of connected subwoofer(s) to neutral: Phase: 0, Cut-Off: Maximum and Level at 50% of maximum. When connecting the Lyngdorf boundary woofers, you should connect the analog outputs to the BYPASS input of the woofer.
Measuring distances
When measuring the distance to your main speakers, measure from the preferred listening position (the focus position) to the front of the speakers.
When measuring the distance to a subwoofer, measure from the preferred listening position to the back corner of the subwoofer.
Always perform a new RoomPerfect™ calibration when you have changed settings in the Output setup.
Introduction to RoomPerfect™
It is very difficult to design a perfect listening environment with a symmetrical setup and a perfect reverberation time without vibrating surfaces like windows. A traditional setup of speakers requires uneven distances to back and side walls to avoid having the reflections arrive to the listening position at the same time, as this would have a negative effect to the frequency response. Having strong reflections after each other is though causing smearing of the sound and reduces the overall dynamic performance.
RoomPerfect™ is designed to analyze and correct for the negative effects that the listening room has on the speaker sound. Correcting the frequency response only, the setup of speakers should focus on having the optimal dynamic performance by positioning all speakers as close to the back wall as possible – and the sub(s)preferably into the front corners of the room
Other correction systems will at their best offer a range of target curves for the calibration, whereas RoomPerfect™ will identify the sound properties of your speakers and use these for the calibration.
RoomPerfect™ is therefore not just an equalizer, but in fact the only true room correction system.
If you want to change the target curve (the tonal balance of your speakers) for the calibration, you can enter your own pre-eq filter design under the Output Setup. Through a new calibration process, RoomPerfect™ will then clean up the new tonal balance.
Global filter
The global filter improves sound quality across the whole room. When you are moving around a room, the global filter gives the best result.
Focus position
The focus filter improves the sound quality at a specific listening position. This makes the focus filter the best solution for optimal sound quality at a single listening position. A total of 8 focus positions can be stored after the initial calibration.
See our website www.lyngdorf.com for more detailed information.
RoomPerfect™ Setup
The RoomPerfect™ microphone is a very sensitive and finely calibrated device which must be treated with utmost care. If the microphone has been dropped on the floor, it may be damaged. If this is the case, obtain a new microphone from your Lyngdorf Audio representative before performing the system calibration.
RoomPerfect™ Preparations
- Place the RoomPerfect™ calibration microphone on the stand. Be sure to fasten the screws properly so the microphone does not move during a measurement.
- Plug the supplied microphone cable into the microphone.
- Connect the microphone cable to the TDAI-3400 using the included mini-jack connector.
Placing the Microphone in the Focus Position
When you are prompted to place the microphone in the focus position, connect the microphone to the microphone input on the front of the TDAI-3400 and place the microphone, using the microphone stand, in your primary listening position. The height and the orientation of the microphone should correspond to your head’s height and direction.
Volume Setting
Press Enter and a test signal will start from the left speaker. The system will give an estimated optimal volume for calibrating the system or will accept the current volume. Adjust the volume if required by the system and retry the measurement.
The calibration volume should not be so loud that it is inconvenient to you, or that it causes damage to your loudspeakers. If this is the case, set it to a lower and more appropriate level. A low volume can result in a longer calibration time or a measurement time-out. A low volume and long measurement will not affect the quality of the result.
If the system continues to require higher signal level, the problem could be a defective adaptor, cable or microphone.
Measuring the Focus Position
When the calibration volume has been set, RoomPerfect™ will send a range of pure tones to measure the focus position. If there is noise in the room, the measurement may take longer. This will not affect the quality of the result.
See RoomPerfect™ troubleshooting if the measurement stops prematurely, and then retry the measurement.
Measuring Random Room Positions
When the focus position has been measured, the next step is to measure the acoustical properties of the room. It is important to perform well spaced measurements to get a comprehensive image of the acoustical properties of the room. See RoomPerfect™ troubleshooting if the measurement stops prematurely.
Keep taking measurements until RoomKnowledge reaches 90%.
Note:
RoomKnowledge relates to the level of new information in the last measurement – if there is little new information, the system will translate it to the fact that it knows nearly everything. When the RoomKnowledge does NOT increase after a measurement, it means that the measurement gave a lot of new information to the calibration!
These are the rules of thumb when measuring the room:
- The microphone should be in random and varying positions, heights, and orientations. Point it up/down/sideways, the more random positions the better.
- The measurements should cover the primary listening area.
- Do not take measurements behind plants, furniture, etc.
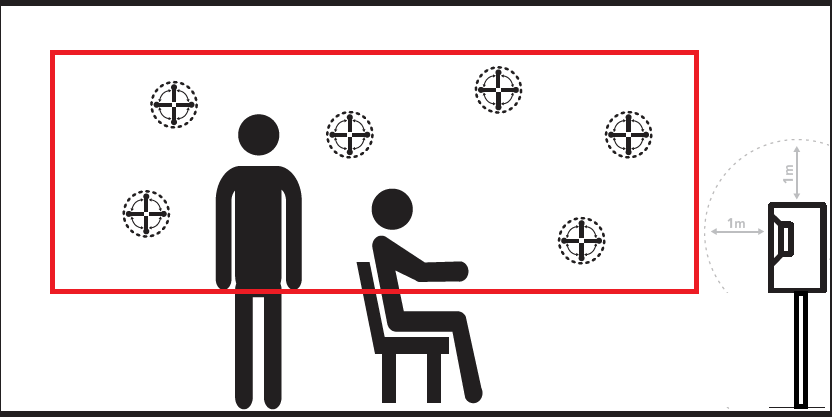
Side view of room
- The microphone should not be closer than 0.5m/1.5ft from the floor, ceiling, and walls.
- The microphone should be at least 1m/3ft from the front of the loudspeakers.
- There should be at least 50cm/1.5ft between each measurement.
- Do not take symmetrical measurements in the room.
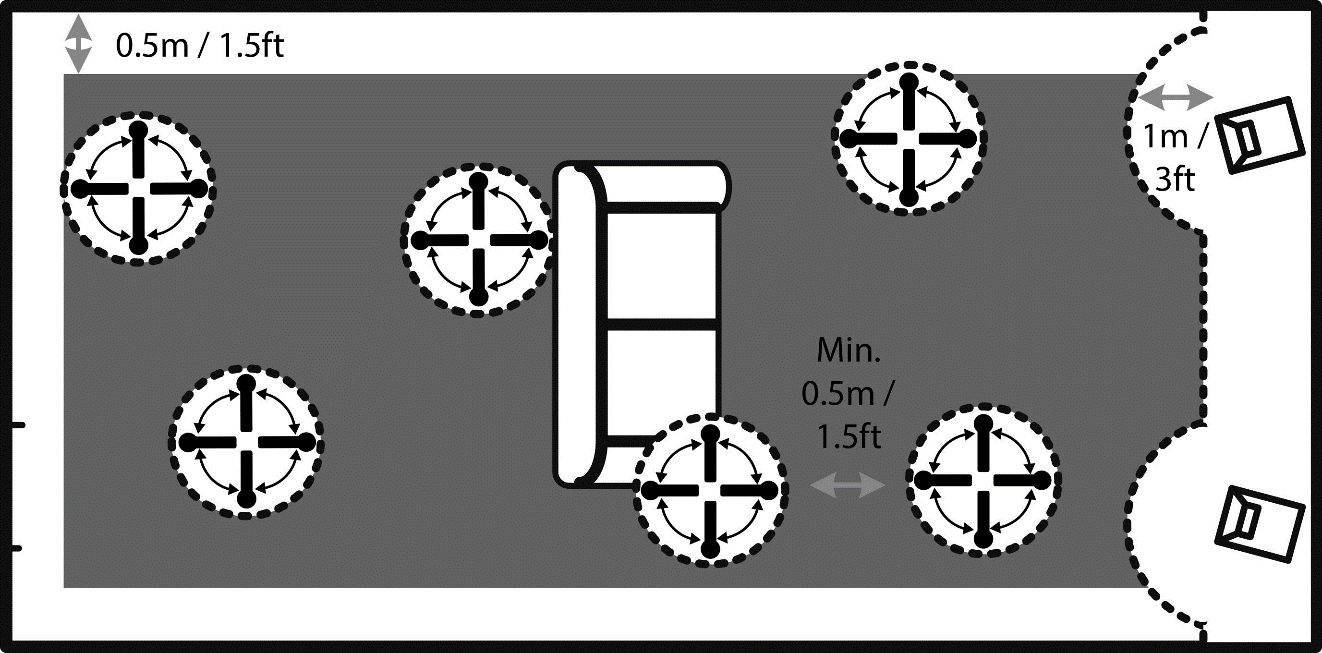
Top view of room
To fully optimize the systems understanding of the room’s acoustical properties, we recommend you keep doing measurements until the RoomKnowledge is above 95%. The higher the RoomKnowledge, the more accurate the room correction filters will be.
Calculation of Focus and Global Filters
When room measurements are complete, the system will calculate the focus and global filters automatically.
Notes:
RoomKnowledge is calculated from the amount of NEW information is in the measurement compared to the data already stored. It is therefore the target to have as SLOW an increase in RoomKnowledge as possible.
We recommend that you ALWAYS take a backup of TDAI-3400 settings after having performed a RoomPerfect™ calibration (see Manage Software in the Setup section).
Voicing Setup
A voicing is an equalizer filter that can be activated to amplify or attenuate certain frequencies according to your personal preferences. For each Source you can dedicate a Voicing, meaning that you can emphasize bass on one input without sacrificing neutrality on others.
Exporting and Importing Voicings
It is now possible to download single voicings to a file and to add new voicings by uploading those files as well. This will make it possible to copy a voicing from one device to another. The file format is identical for all enabled Lyngdorf products, so if you have a voicing you like on your TDAI-3400 amplifier, it is possible to add that to your Lyngdorf multichannel processor or vice versa.
Note:
Single voicing files have the extension single_voicing.xml and this may not be changed.
You can also download and upload an entire set of voicings. Again, these files will work throughout the devices which support this feature.
Note:
Uploading a set of voicings with this feature will replace all voicings in the amplifier.
Files with an entire set of voicings have the extension .voicings.xml and this must not be changed
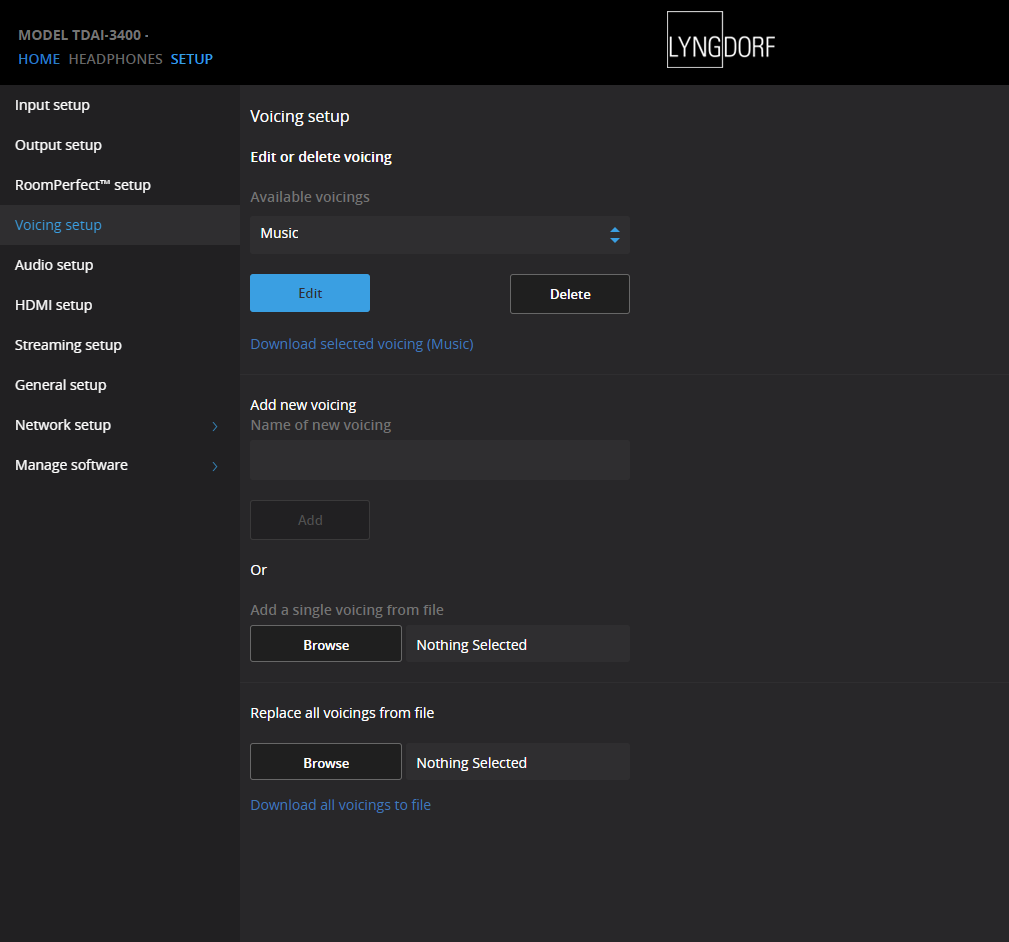
Edit or delete voicing
This dropdown list contains the voicings currently in the amplifier. Selecting a voicing in the list will allow you to delete or edit the selected voicing (this will open the voicing editor)
Add new voicing
To create a new voicing using the voicing editor, enter the name of your new voicing and press add.
To add a voicing from a single_voicing.xml file, browse for the file and then press add.
Replace all voicings from file
This is the functionality to replace all voicings in the amplifier with a new set from a .voicings.xml file. Remember that this will overwrite all voicings currently in the amplifier. Click browse to find the .voicings.xml file you wish to upload and then press Apply to use it.
On the bottom of the page is a link to download the current set of voicings in the amplifier to a .voicings.xml file.
Through selecting any of the stored Voicings, you can see the details by selecting EDIT. You can also delete the stored Voicings and add new designs here.
Creating Voicings
A Voicing can combine up to eight filter sections. For each section, you can choose between certain filter designs, which then in combination will give you the total correction of the Voicing.
For each Voicing you will see a green line showing the total correction as well a blue line showing the correction caused by the selected filter section. If there is only one active filter section, only the blue line is shown. You can select between following filter designs:
- Low Pass: Functions as a crossover filter reducing the signal above the frequency.
- High Pass: Functions as a crossover filter reducing the signal below the frequency.
- Low Shelf: Attenuates the lower frequencies to a specified level.
- High Shelf: Attenuates the higher frequencies to a specified level.
- Parametric: Attenuates specific frequency.
All these filters can be with positive or negative gain – effectively reversing the effect of the filter.
You can adjust the Overall gain for each voicing in order to be able to switch between voicings without experience any change in perceived level.

In this example (Action Movie Voicing) you will see the combined effect of two filter sections:
- Negative High Shelf from 120 Hz creating a boost in the bass region.
- Negative High Shelf from 8,000 Hz reducing the highest frequencies.
- Overall gain set to +6 dB as compensation for the reduction in overall level experienced with the two filters.
Try experimenting by creating your own Voicings and test the functionality of the different filter sections.
Audio Setup
ICC (Intersample Clipping Correction)
ICC can be set to enabled or disabled.
Digital audio tracks normally exceed 0 dBFS (decibels relative to full scale), why they will be clipped when being up sampled or otherwise processed in the audio chain resulting in distortion. With ICC enabled the TDAI-3400 will dynamically allow for extra headroom to avoid clipping during processing the music. Changing inputs or going into standby mode will reset the ICC level.
Hot Tip: Press INFO on your remote to see the signal level of the present audio input. It is a peak-meter and will be reset, when you switch input.
Show RoomPerfect™ bypass
If you want to discover what effect the calibration has had on your sound, you can activate a bypass function, which now can be selected on your remote control.
Mute at power on if headphones are connected
This function allows you to control, if the headphone connector should control the mute function on your speakers.
Main volume control / Headphones volume control
These settings control the overall output through your main speaker system / headphone output
Maximum volume
The maximum volume setting is a safety precaution used for limiting the maximum volume which can be achieved by spinning the wheel or increasing volume via the remote. This can be set to protect your loudspeakers against overload.
Default volume
The default volume setting controls the default volume at start-up.
HDMI Setup
What is CEC?
Consumer Electronics Control (CEC) is an HDMI feature designed to allow you to command and control CEC-enabled devices that are connected through HDMI, by using only one of the remote controls (for example, controlling the volume level in the TDAI-3400 by using the remote control of the TV).
The level of CEC implementation depends on the manufacturer of each product, and even if brand new, not all electronic devices supports CEC. As the television is “CEC master” in a HDMI setup, the CEC implementation of the television will determine, what is possible for the entire system.
Enable CEC
Enables and disables CEC (Consumer Electronics Control) over HDMI.
HDMI output
When enabled, this feature will send the current digital stereo signal though the HDMI cable to the TV.
This feature requires that the digital output has been configured under the Output Setup menu. The digital output should be set to Full-range and Full-scale.
Notes:
As default, CEC is not activated on HDMI to comply with stand-by power regulations. CEC functionality only works with the TDAI-3400 set in Network Stand-By.
CEC is marketed by manufacturers under individual names and designed for promoting the connection of same brand sources. (SONY: Bravia Link, Panasonic: Viera Link, etc.)
Streaming Setup
The TDAI-3400 can access radio stations from the internet, music files on your local network or on a FAT32 formatted USB drive or you can stream music to the TDAI-3400 from your mobile devices.
In this menu you can configure the basic setup of the music streaming:
- Streaming players can control volume: Set to Off or On.
- Streaming players can change input source: Set to Off or On.
- Streaming players can power on the device from standby mode: Set to Off or On.
Streaming Playback Interface
The setup of the streaming player is done in the interface positioned in the HOME section of the web interface.
Roon
When the TDAI-3400 is connected to your local network, it will automatically be available from Roon enabled devices (requires a Roon server account).
UPnP
This function allows you to select and play music files in UPnP enabled libraries on your local network. The button “..” brings you up in the menu structure of your library.
You might have problems in accessing files as UPnP a set of protocols and not a defined standard. The implementation of UPnP is therefore not always fully functional for media playback.
USB
This function allows you to select and play music files on attached USB devices (requires FAT32 format).
The button “..” brings you up in the menu structure of your library. It opens when an USB device is detected in any of the inputs.
vTuner
This function allows you to access internet radio stations and podcasts around the world. You can search stations and podcasts through references to genre or geographical relation.
When a station or podcast is playing, you can assign it to one of the 10 presets, and it will now automatically appear as a new input for direct selection.
Airplay
When the TDAI-3400 is connected to your local network, it will automatically be available for playback from your Airplay enabled devices.
Spotify Connect
When the TDAI-3400 is connected to your local network, it will automatically be available from your Spotify Connect enabled devices (requires a Spotify Premium account).
Streaming from PC or MAC
Installing the USB streaming audio driver
To stream high quality audio from a Windows PC to the TDAI-3400, you need to install the Windows driver on your PC. The driver can be found on the product page of www.lyngdorf.com. Mac and Linux users do not need to install any drivers to stream audio to the TDAI-3400 in the optimal quality.
Using the USB B streaming audio input
To stream music to the TDAI-3400, connect a USB cable between the computer and the “USB Audio In” connector of the TDAI-3400. Select “USB” as input on the TDAI-3400 and start playing music on your computer.
General Setup
Standby level
Network Standby will allow control systems to activate the TDAI-3400 through the network. Deep Sleep brings the power consumption at stand-by to the required minimum, thus causing some delay in activation of the amplifier.
Auto off delay
If you don´t press any buttons or audio isn´t being played, this sets the idle time required for automatic shut-down of the amplifier.
Trigger input function
The trigger input can be used to activate the TDAI-3400 from a source.
The available settings are “Amp Power Mode” or a specific input.
- “Amp Power Mode” will start the TDAI-3400 on the input last used.
- Always select specific input.
Note:
If the TDAI-3400 has been switched to another input, the trigger command from the source connected will NOT turn off the amplifier.
Display settings
- Brightness level: Set the brightness of the display.
- Enable timeout: If enabled, the main display will switch off after 10 seconds of inactivity.
Password
Lock the menu system to avoid unintentional changes.
Unlock the menu system by entering the code: 7800. When the code has been entered, and you exit the setup menus, the menu lock will reactivate automatically after 5 minutes.
Remote control
Activate or deactivate the remote control. This function is useful if you are using a home automation system and other remotes are using the same IR codes as the TDAI-3400 remote.
Network Setup
Show Status
Shows IP address and as well as MAC address of the TDAI-3400. Enter this IP address in a browser to see the amplifiers setup menu.
Edit Wired setup
Shows Status and allows for setting a Static IP address instead of the default DHCP (Dynamic).
(See later section as to setting up a static IP address).
Wi-Fi (Wireless connection)
Edits the WIFI Setup and allows for setting a Static IP address instead of the default DHCP (Dynamic).
WI-FI Setup Guide
This guide will allow you to connect to your wireless network through scanning networks, manually entering the reference of the network or using WPS (Wireless Protection Setup – activate and the press WPS button on your WIFI router!).
Apple Wi-Fi Accessory Configuration
With this function activated you can find the TDAI-3400 in the Wi-Fi settings of an iPhone or iPad connected to the same network. From the iPhone or iPad you can now share the Wi-Fi settings to the TDAI-3400.
Enable WIFI
Enables and disables the WI-FI antenna in the amplifier.
Manage Software
From this main menu, you can access TDAI-3400 software information, backup, restore, etc.
Backup
Make a complete system backup to the SD card or a USB drive connected to one of the USB A connectors. It will include all settings, the speaker setup and RoomPerfect™ calibration. When the backup is complete, the TDAI-3400 will go into standby mode.
Restore
Restore the system from a backup stored on the SD Card or on a connected USB pen drive.
Factory Reset
Restore the system to the default factory settings.
Note:
All user preference settings, system data, and RoomPerfect™ data are lost when the TDAI-3400 is restored to the default settings.
Download system log
To be used when reporting on bugs identified during use. A file with the system log will be stored on your device. If you identify a problem, please send this log together with a copy of the Backup file to service@lyngdorf.com for reference.
Update Software
Shows reference information about the current software in the TDAI-3400 and shows eventual newer software available from the remote server.
Troubleshooting
RoomPerfect™
The calibration microphone is very sensitive and may pick up unwanted noise, including subsonic signals and background noise, which disturbs the measurements. If the signal is disturbed, it will take longer for the system to make a correct measurement.
A measurement that has been disturbed by noise but completed will always be correct; it is not necessary to redo it. If the measurement has stopped due to an error, one of the error messages below will be shown.
Error Messages
No microphone connected
No microphone is connected, or the microphone cable is not working. Check that the microphone cable is connected to the microphone socket on the back panel. If the problem continues, test the microphone cable by connecting the microphone directly to the microphone socket and select Retry.
If the microphone is detected, replace the microphone cable and retry the measurement.
Fault – No signal
This error message can arise due to a signal classification of no sound. This happens if the sound volume has been muted or a cable is disconnected.
- Check the sound volume.
- Check all cable connections, including interconnects, speakers, amplifiers, etc.
- Check the measuring signal volume.
If none of these measures solve the error, request a replacement microphone from Lyngdorf Audio.
Fault – Signal clipping
Either the incoming signal has been classified as too loud, resulting in clipping or distortion, or a loud noise in the immediate environment has corrupted the measurement results. If a loud noise has in fact occurred, such as the sound of a closing door, reduce noise levels inside and in the immediate vicinity of the room and repeat the measurement. If no loud noise has occurred, reduce the volume of the signal and repeat the measurement.
Fault – Low signal
This error message is displayed when the measurement has lasted more than 5 minutes for the low-frequency signal or more than 2 minutes for the high-frequency signal. This happens most often when using a low-level measuring signal compared to the background noise in the listening environment, which results in prolonged measuring times. Raise the measuring signal volume or reduce the noise in the environment before continuing with the measurement.
Can´t turn on via LAN or Control System
The TDAI-3400 needs to be set to Network Standby to be able to turn on via a control system. It will not turn on when in Deep Sleep. This is controlled in the General Setup menu.
Retrieving and Sending an Error Log
To retrieve an error log, you need to access the TDAI-3400 via your browser. Here you can download a System Log and a backup file and email it to your Lyngdorf Audio representative.
3D/4K/HDR Compatibility Not Detected
If the TDAI-3400 has not finished the start-up, a Blu-ray player will not be able to detect its compatibility.
Restart the player to fix the problem.
Wired Network Setup
Connecting to TDAI-3400 with a Network Cable
It is possible to get access to the TDAI-3400´s web interface via a direct cable connection between the TDAI-3400 and a computer, or a connection via a hub or switch.
If you have a direct cable connection to a laptop (with no switch or router between the two) the network cable must be a crossover type. Furthermore, the Mode option in the Network Setup menu must be set to Manual IP. Finally, you must manually set an IP address on the computer you intend to use for setting up the TDAI-3400.
Set Up a Fixed IP Address in Windows 7
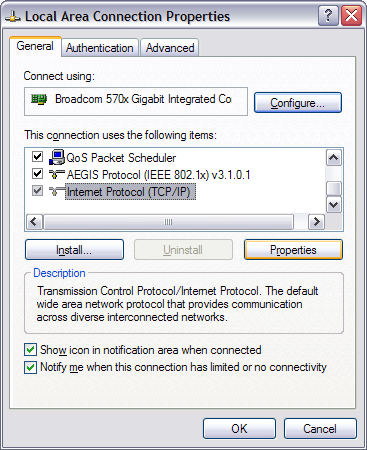
- Click Start / Control Panel / Network Connections to find the network connection that represents your connection to the Internet. Most often, this is labeled simply Local Area Connection.
- Right-click the connection and select Properties.
- Click Internet Protocol (TCP/IP) in the list (you may have to scroll down the list to find it).
- Click Properties.
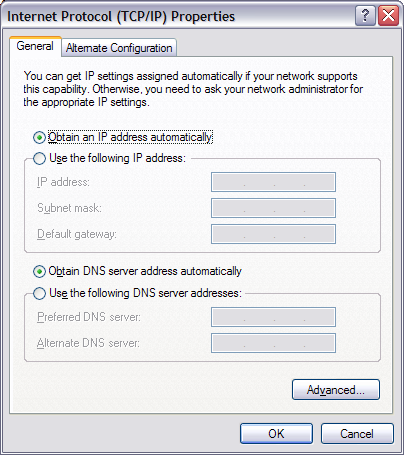
- Most default configurations will have both Obtain an IP address and Obtain DNS server address automatically selected by default.
- Click Use the following IP address and enter the following:
- IP address: 192.168.1.2
- Subnet mask: 255.255.255.0
- Default gateway: 192.168.1.1
- Click OK to close the configuration windows, and you should now be able to access the TDAI-3400 via your Internet browser.
Set Up a Fixed IP Address in Windows Vista or Windows 10
- In Windows Vista, click Start / Control Panel / Select Network and Internet / Network and Sharing Center.
- In Windows 10, right-click Start, then select Control Panel. Select Network and Internet / Network and Sharing Center.
- Click Manage Network Connections in the list of tasks.
- Right-click your local area connection and click Properties.
- Select Internet Protocol (TCP/IP) from the list.
- Click the Properties button.
- Click “Use the Following IP address” and enter the following:
- IP address: 192.168.1.2
- Subnet mask: 255.255.255.0
- Default gateway: 192.168.1.1
- Click OK to close the configuration windows, and you should now be able to access the TDAI-3400 via your Internet browser.
Cleaning and maintenance
The TDAI-3400 does not require any regular maintenance except to keep its exterior clean. Simply wipe it with a clean, soft cloth. A small amount of non-abrasive cleaner may be used on the cloth to remove any dirt or fingerprints. Do not use abrasive cleaners or cleaners containing liquid solvents.
Serial Control Manual
To get a copy of the Serial Control Manual, which describes how the serial control interface of the device works, download it from www.lyngdorf.com
Technical assistance
For the latest version of this manual, please check the Lyngdorf Audio website: https://lyngdorf.com.
If you have any problems with or questions regarding your Lyngdorf Audio product, please contact your nearest Lyngdorf Audio representative or:
SL Audio A/S
Ulvevej 28
7800 Skive
Denmark
E-mail: contact@steinwaylyngdorf.com
Web: https://steinwaylyngdorf.com
TDAI-3400 ⋅ Specifications
- Description: 2-channel integrated amplifier and audio processor
- Power handling: 2×400 W RMS @ 4 Ohm / 2 × 200 W RMS @ 8 Ohm
- Maximum output current: 40 A
- Audio specifications:
- Frequency Response: ±0,5 dB from 20 to 20,000 Hz
- Total Harmonic Distortion: 0.05% maximum from 20 to 20,000 Hz
- THD-N 1 w / 8 Ohm 0,04%
- THD-N 1 w / 4 Ohm 0,04%
- Digital inputs (asynchronous):
- 1 × AES-EBU (≤ 192 kHz / 24 Bit)
- 2 × Coaxial (≤ 192 kHz / 24 Bit)
- 3 × Optical (≤ 96 kHz / 24 Bit)
- 1 × USB B (≤ 384 kHz / 32 Bit, ≤ DSD128, DXD)
- Analog inputs:
- 2 × Analog Single Ended RCA (Maximum level:
- 4.0 V = 0 dBFS)
- 1 × Microphone input for RoomPerfect™ calibration
- HDMI module (optional):
- 1 × HDMI Output
- 3 × HDMI Inputs (PCM ≤ 192 kHz / 24 Bit)
- eARC / ARC (PCM ≤ 192 kHz / 24 Bit)
- CEC integration
- HDMI 2.0 b support
- HDCP 2.2
- Resolutions requiring 600 MHz clock supported
- High-end analog input module (optional):
- 1 × RIAA Phono MM
- 2 × single ended RCA
- 1 × balanced XLR
- Digital outputs:
- 1 × coaxial digital (96 kHz / 24 Bit)
- Analog outputs:
- 1 × analog single ended RCA
- 1 × analog balanced XLR
- 1 × headphone output 3.5 mm Jack
- EQ:
- RoomPerfect™
- Pre-Equalizer
- ICC
- 32 × adjustable voicings holding ≤ 8 filters with adjustable gain and Q
- Mediaplayer:
- Roon Ready
- Spotify Connect
- Tidal Connect
- DLNA Support (uPnP)
- Airplay
- Local file playback (USB)
- Internet Radio (vTuner)
- MQA Core Decoder (output is 88.2 kHz or 96 kHz)
- Wireless connections:
- Bluetooth (for Remote Control and BLE)
- Wi-Fi (802.11 n/ac)
- Interfaces:
- Web-interface
- IP Control
- 1 × DB9 connector for RS232 control
- 1 × RJ45 Ethernet LAN connector
- 2 × USB connectors (Type A)
- SD card slot (Backup of filters and settings)
- Accessories included:
- RoomPerfect™ Microphone
- Microphone stand
- Cable and mini-jack connector
- Remote control (IR / BLE)
- Placement options: Optional rack mount or freestanding
- Heat dissipation value: 270 BTU
- Dimensions including connectors (W × H × D):
- 45 × 10.5 × 36 centimeters
- 17.7 × 4.1 × 14.1 inches
- Weight:
- 8.2 kilograms
- 18.1 pounds
- Finish: Matte black