MOON 371 Manual
Safety Guidelines
WARNING: Chemical Burn Hazard
Do not ingest the batteries.
The remote control supplied with this product contains batteries, which, if swallowed, could cause severe internal burns within two hours and lead to death. Keep new and used batteries away from children. Keep exposed batteries away from children. If you have reason to believe that batteries have been inserted into the body, seek medical attention. If the battery compartment does not close securely, stop using the remote control and contact support@simaudio.com.
Read these instructions.
Keep these instructions.
Heed all warnings.
Follow all instructions.
Do not use this apparatus near water.
Clean only with a dry cloth.
Do not block ventilation openings. Install in accordance with the manufacturer’s instructions.
Do not install near heat sources such as radiators, heat registers, stoves or another apparatus that generate heat.
Do not defeat the safety purpose of the polarized or grounding-type plug. A polarized plug has two blades with one wider than the other. A grounding-type plug has two blades and a third grounding prong. The wide blade or the third prong is provided for safety. If the provided plug does not fit into the outlet, consult an electrician to replace the obsolete outlet.
Protect the power cord from being walked on or pinched, particularly at plugs, convenience receptacles, and the point where they exit from the apparatus. Unplug mains cord during transportation.
Only use attachments and accessories specified by the manufacturer.
 {.float-right small-xx} The apparatus is heavy and requires two people to lift it. Exercise caution when maneuvering. Use only with the cart, stand, tripod, bracket, or table specified by the manufacturer or sold with the apparatus. When a cart is used, use caution when moving the cart/apparatus combination to avoid injury from tip over.
Unplug this apparatus during lightning storms or when unused for long periods of time.
Refer all servicing to qualified service personnel. Servicing is required when the apparatus has been damaged in any way such as when the power cord has been damaged; liquid has been spilled or objects have fallen into the apparatus; or the apparatus has been exposed to rain or moisture, does not operate normally, or has been dropped.
No naked flame sources, such as candles, should be placed on the apparatus.
WARNING: TO REDUCE THE RISK OF FIRE OR ELECTRIC SHOCK, DO NOT EXPOSE THIS APPLIANCE TO RAIN OR MOISTURE.
CAUTION: TO REDUCE THE RISK OF ELECTRICAL SHOCK, DO NOT REMOVE COVER. NO USER-SERVICEABLE PARTS INSIDE. REFER SERVICING TO QUALIFIED PERSONNEL.
 The lightning flash with the arrowhead symbol, within an equilateral triangle, is intended to alert the user to the presence of uninsulated “dangerous voltage” within the product’s enclosure that may be of sufficient magnitude to constitute a risk of electric shock to persons.
 The exclamation point within an equilateral triangle is intended to alert the user to the presence of important operating and maintenance (servicing) instructions in the literature accompanying the appliance.
 Marking by the “CE” symbol (shown right) indicates compliance of this device with the EMC (Electromagnetic Compatibility) and LVD (Low Voltage Directive) standards of the European Community.
 Waste from Electrical and Electronic Equipment (WEEE): This equipment must be sent to a separate collection facility for the recovery and recycling of electrical and electronic waste wherever dedicated facilities exist. WEEE regulations aim to contribute to sustainable production and consumption, addressing environmental and other issues caused by the growing number of discarded electronics. The symbol for the separate collection of electrical and electronic equipment indicates that this product should not be discarded as unsorted waste.
FCC: This device is equipped with the MiND Music Streamer module. This device contains Transmitter Module FCC ID: 2AJYB-S810. This device complies with part 15 of the FCC Rules. Operation is subject to the following two conditions: (1) This device may not cause harmful interference; and (2) this device must accept any interference received, including interference that may cause undesired operation.
The Spotify Software is subject to third party licenses found here: spotify.com/connect/third-party-licenses.
Apple, AirPlay, iPad, iPhone, and Siri are trademarks of Apple Inc., registered in the U.S. and other countries. Use of the Works with Apple badge means that an accessory has been designed to work specifically with the technology identified in the badge and has been certified by the developer to meet Apple performance standards.
MQA technology requires less network bandwidth to stream high-quality audio files. This product implements the technology under license from MQA Limited. For more information about MQA, please visit: mqa.co.uk.
ALWAYS disconnect your entire system from the AC mains before connecting or disconnecting any cables, or when cleaning any component. To completely disconnect this apparatus from the AC mains, use the rocker switch on the rear panel or disconnect the power supply cable from the AC receptacle.
The unit must be terminated with a three-conductor AC mains power cord, which includes an earth ground connection. To prevent shock hazard, all three connections must ALWAYS be used. Connect the unit only to an AC source of the proper voltage; both the shipping box and rear panel serial number label will indicate the correct voltage. Use of any other voltage will likely damage the unit and void the warranty.
ALWAYS connect the unit only to an AC source of the appropriate voltage. Both the shipping box and rear panel serial number label indicate the correct voltage. Incorrect voltage could damage the unit and void the warranty.
AC extension cords are NOT recommended for use with this product. The mains plug of the power supply cord shall remain readily accessible.
NEVER use flammable or combustible chemicals for cleaning audio components.
NEVER operate the unit with any covers removed. There are no user-serviceable parts inside. An open unit, especially if it is still connected to an AC source, presents a potentially lethal shock hazard. Refer all questions to authorized service personnel only.
NEVER wet the inside of the unit with any liquid. If a liquid substance does enter your unit, immediately disconnect it from the AC mains and take it to your MOON Partner for a complete check-up.
NEVER spill or pour liquids directly onto the unit.
NEVER block air flow through ventilation slots or heatsinks.
NEVER bypass any fuse.
NEVER replace a fuse with a value or type other than those specified.
NEVER attempt to repair the unit. If a problem occurs, contact a MOON Partner.
NEVER expose the unit to extremely high or low temperatures.
NEVER operate the unit in an explosive atmosphere.
ALWAYS keep electrical equipment out of reach of children.
ALWAYS unplug sensitive electronic equipment during lightning storms.
WARNING: Do not expose batteries or battery pack to excessive heat such as sunshine, or fire or the like.
Let the Music Guide You
The Compass Collection from MOON is more than a mere line of products. It’s not even just a promise of exceptional quality and style. The Compass Collection is an excuse to dream; a conceptual offering to ambitious individuals who may not even realize yet that they deserve the finest home listening experience imaginable.
Envisioned for the music lovers of tomorrow and crafted for the audiophiles of today, the Compass is your way forward, a gateway to the MOON universe, engineered for outstanding performance and lasting reliability, and drawing inspiration from the acclaimed North Collection. The Compass Collection harmonizes modern aesthetics with timeless sophistication. Sleek, elegant lines and minimalist design combine with discreet, intelligent features and an intuitive interface to convey a striking appearance, elevating and refining the listening environment.
Every note and beat resonate with unprecedented clarity to transform casual listeners into passionate connoisseurs.
Let the music guide you on your journey with the Compass Collection.
Before Setting Out…
Inspecting Your MOON 371
Carefully remove the unit from its packaging. Visually inspect it, and in the case of damage, report it to your MOON retailer immediately.
The packaging materials were designed to protect this product while in transit. Store these materials in a dry location for the duration of the warranty period.
The information contained in this guide is subject to change without notice. The most recent version is available at simaudio.com/guides-downloads.
The MOON 371 includes:
MOON CRM-4 remote control
battery compartment token
carrying pouch
AAA batteries (2)
quick-start guide
power cable
ethernet cable
warranty information sheet
Note the serial number of your MOON 371 for future reference.
Installing Your MOON 371
Carefully consider the location and environment of your installation.
Set the 371 upon an open, stable, and flat surface. The device requires sufficient space above and around it to adequately disperse the heat it generates. Maintain a minimum gap of 5 cm (2”) around the sides and 10 cm (4”) above of the unit to enable airflow.
The performance of this device will continue to improve during the first 100 hours of listening. The spirit of this recommendation is to temper expectations and delay your first critical listening session until after all the components in the circuit have stabilized. But that doesn’t mean you can’t enjoy it from the very first note. It just means that it’ll behave most consistently after a few weeks of listening.
Explore the 371
Front Panel
DISPLAY
The display provides useful feedback about the state of the device. It identifies the active input and volume of the preamplifier, as well as the sample rate of the DAC. On the MiND input, it can identify the song, artist, and album alongside the album art.
 Standby
-
Use the Standby button to toggle the device between active and inactive modes when the device is powered on.
 Mute
Mute-
Use the Mute button to cut and restore the audio signal to all outputs.
-
Adjusting the volume also restores muted audio.

 Input
Input-
Use the Input buttons to cycle through enabled inputs.
 Setup
Setup-
Use the Setup button to access the extensive configuration menu that allows you personalize your 371.
Navigating the Setup Menu
Use the volume knob to scroll through the options.
Use
 to confirm a selection.
Use
to cancel a selection or return to the previous menu options.
Entering Text
Use the volume knob to scroll through characters.
Use the
buttons to move the cursor.Use the
button to register the text.
- OK
-
Use the OK button to select or confirm on-screen prompts.
- Volume
-
Use the Volume control to adjust the volume and interface with the configuration menu.
-
Rotating the knob adjusts the volume in 1.0 dB increments between 0 and 30, and in 0.5 dB increments between 30 and 80.
- Headphones
-
¼” TRS (stereo) output.
-
Connecting headphones automatically mutes the loudspeaker outputs.
Rear Panel
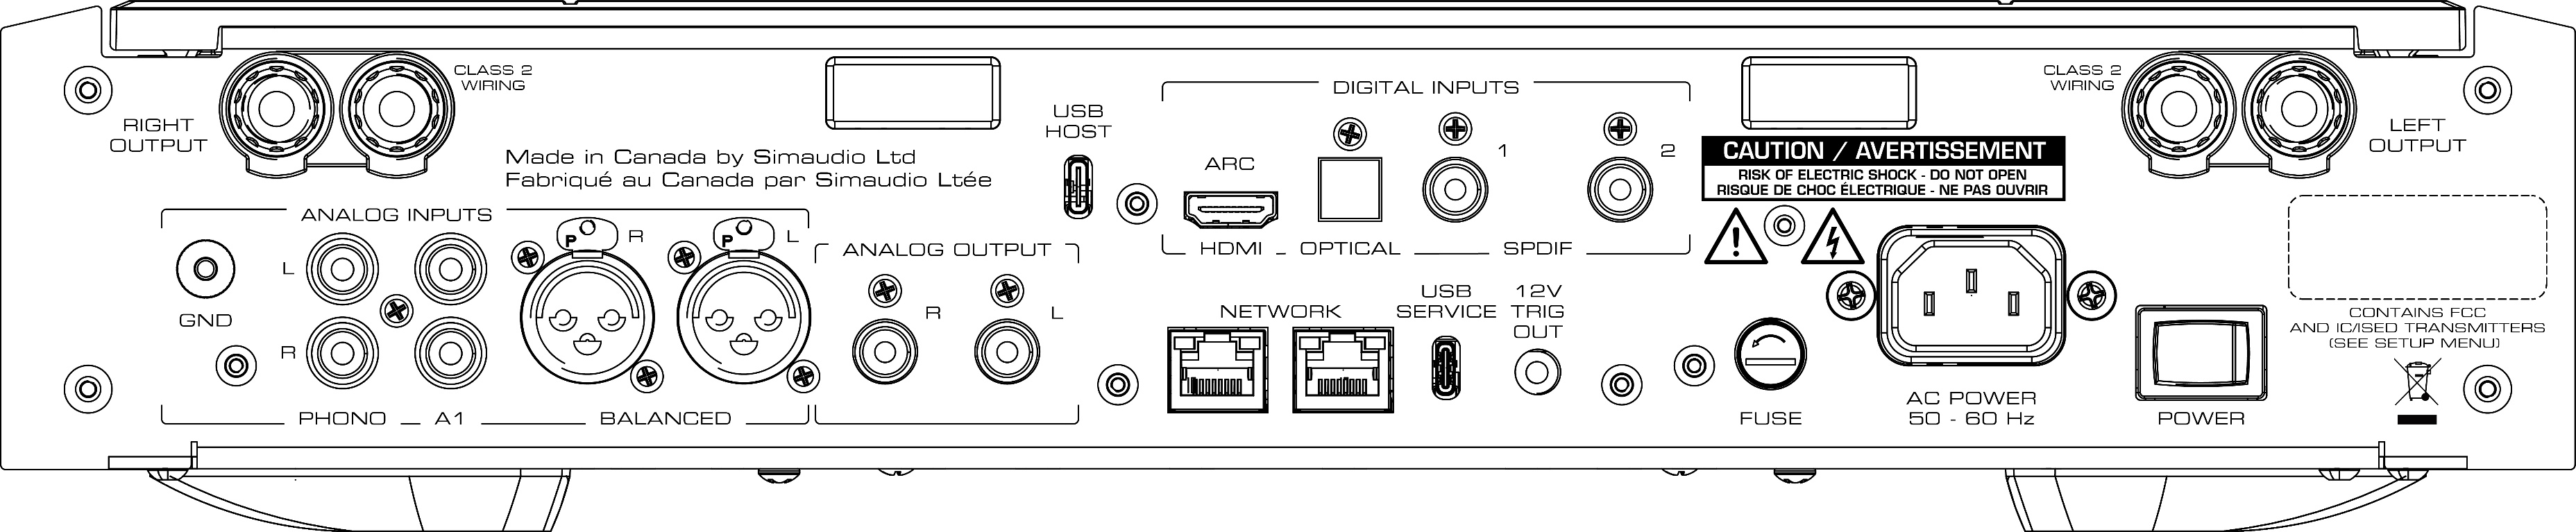
- RIGHT OUTPUT & LEFT OUTPUT
-
The RIGHT OUTPUT & LEFT OUTPUT jacks are binding posts for connecting loudspeakers.
-
Insert banana pins through the holes in the extremities of the barrels or unscrew the barrels to expose a gap underneath for spades and bare wire contacts.
- USB HOST
-
The USB HOST port is a USB type-c connector. Use it for playback of audio files on a storage drive using the MiND Controller.
-
Compatibility is not guaranteed with every brand and model of USB drive, nor with every file system. For the best performance and navigation experience, use a DLNA server on a UPnP drive to share the files over a network.
Digital Inputs
- HDMI ARC
-
Use the HDMI ARC connector to connect an ARC-enabled TV for PCM audio input.
- OPTICAL
-
Use the optical (TOSLINK) port to connect a two-channel digital PCM signal source.
- SPDIF
-
Use the two coaxial (RCA) ports to connect a two-channel digital PCM signal source.
Analog Inputs
- GND
-
terminal to ground a turntable.
- PHONO
-
Use the single-ended RCA Phono port for connection to a record player with a moving-magnet (MM) or moving-coil (MC) phono cartridge.
- A1
-
Use the single-ended RCA A1 port to connect a line-level analog signal source.
- BALANCED
-
Use the differential BALANCED ports to connect a balanced analog line-level signal source.
- ANALOG OUTPUT
-
To operate the 371 as a preamplifier, connect the variable-volume ANALOG OUTPUT output ports to a power amplifier, a subwoofer or active loudspeakers.
- NETWORK
-
Use the RJ-45 NETWORK ports for network connections over Ethernet cables to a network router or for attaching another device (eg, an NAS device or TV set).
-
Using connections over the NETWORK ports, you can use MOONLink functionality with compatible MOON products.
- USB SERVICE
-
The USB SERVICE port is intended only for use by authorized service technicians.
- 12V TRIG OUT
-
Use the mini-jack (TS) 12V TRIG OUT for a connection to compatible power amplifiers, allowing for Standby synchronization.
- FUSE
-
The FUSE jacket is a magazine containing a power supply fuse.
-
Please note that while some users may report improvements in the performance of their audio equipment when original parts are replaced with after market parts, MOON cannot guarantee the proper functioning of its products under such conditions. Our engineers have ensured that the original fuse should protect your device from catching fire due to electrical calamities. All security, quality, and performance testing, as well as standards certification, is performed with specific components, and any modification from the original design may void its warranty.
- AC POWER
-
for connecting the power cable.
- POWER
-
switch for toggling the device on [—] and off [O].
With the power switched on, the unit may be toggled in and out of Standby using the button on the front panel, a remote control, the MOON MiND Controller mobile app, or by MOONLink.
The unit may require up to a minute to connect to the network. For best performance, the device should remain powered up and may be toggled into Standby when not in use. It should be powered down during extended absences by disconnecting the power cable.
Prepare for Your Journey
Consult the included quick start guide. Follow these steps to connect your MOON 371.
Connect the RIGHT OUTPUT and LEFT OUTPUT terminals on the rear panel of the amplifier to the corresponding terminals (positive [+] to red and negative [–] to black) on your loudspeakers.
For wireless connections, complete Steps 4 – 6 first, then see Step 7. Otherwise, connect an ethernet cable between the 371 and a network router or switch.
To play external audio sources, like a TV or CD player, through your 371, connect them to the INPUTS. You may connect up to three analog sources to the ANALOG INPUTS and up to four digital sources to the DIGITAL INPUTS using the appropriate interconnect cables for each device.
Connect the supplied power cable between the 371 and an electrical outlet.
Toggle the POWER rocker switch to the On [–] position.
After the indicator light stops pulsating, press the button.
If you completed Step 3, skip to Step 8.
Press the
button.Use the volume knob to scroll and
button to select …Go to: Network ► Configuration ► Wi-Fi Parameters ► Automatic
Select the name of your Wi-Fi (SSID) from the list, or Manual if it does not appear.
Enter the Wi-Fi password (Security Key) using the volume knob to scroll through characters, the
and buttons to move the cursor, and the button to save the password.
Download the MOON MiND Controller app from the App Store (for iOS) or Google Play (for Android).
To learn more about this product, follow this QR code, or visit our website.

Plot Your Course
Setup
The 371 features an extensive Setup menu for configuring and customizing many of its functions.
Use the and buttons along with the volume knob to navigate the menu system.
Inputs
Each input may be personalized.
- Label
-
Use the Label field to enter the name that appears on the 371 display.
-
Select a predefined label, or manually enter a custom label.
- Offset
-
Use the Offset parameter to adjust the gain level applied to the input.
-
The volume level of each input may be fine-tuned to match the volume levels of source components connected to other inputs.
- Enable
-
Toggle the Enable field to specify whether the input should be available to select.
-
The input may be hidden to reduce the number of unused inputs to scroll through.
- CEC Settings (HDMI)
-
ARC (Audio Return Channel) is the audio output from a TV over HDMI. It also transmits CEC (Consumer Electronic Control) commands, which enable multiple devices to share commands—such as Standby and volume—from a single remote control.
-
Audio Only: enables audio over HDMI but disables CEC commands
-
Audio + CEC Volume: enables audio and CEC volume control but disables other CEC commands
-
Complete: enables audio and all CEC commands
- Display Sample Rate (MiND)
-
toggles the display to indicate the sample rate while playing
- Home Theatre Bypass (ANALOG & BALANCED)
-
disables 371 volume control for the specified input
-
This mode sets the preamp volume to unity gain, permitting the volume to be controlled exclusively by a home theatre processor or audio-video receiver.
- Phono Configuration (PHONO)
-
Use the Phono Configuration parameter to select between pre-set configurations for either a Moving Magnet or a typical Moving Coil phono cartridge
Network
When the 371 powers up, it attempts to connect to a network.
A wired (Ethernet) connection has priority over a wireless (Wi-Fi) connection. The integrated Wi-Fi antennas are deactivated when a wired connection is established. If a wired connection is not established, the 371 automatically connects to Wi-Fi if it has been configured. If neither a wired nor wireless connection is established, the 371 continuously searches for available Wi-Fi networks.
The MiND Name appears as a playback Zone in the MOON MiND Controller mobile app. The default name is MOON 371, although you may change it to make it easier to identify.
You may use the menu to configure the 371 to use your Wi-Fi by selecting Configuration. There are even Advanced Parameters for Manual configurations.
You may also use the MiND Controller to configure it.
“Information” displays helpful details about the network connection.
Automatic
From the Setup menu, select Network, Configuration, Wi-Fi Parameters, and Automatic.
Select the appropriate SSID (Wi-Fi name) from the list of networks.
If the desired SSID does not appear, return to Wi-Fi Parameters, and select Manual to enter the SSID.
Enter the Wi-Fi password and press
while the cursor is flashing the final character.
Advanced Parameters
It is possible to enter a static IP address, subnet mask, gateway address, and DNS server.
This method is for advanced users only.
If the 371 is connected to another device to extend the network, always power on the device directly connected to the network before powering on the device connected to the first one.
Multiroom
The MOON MiND Controller mobile app includes a feature to combine multiple MiND 2 Zones to play audio together as one cohesive system. In addition to streaming audio via the MiND 2, this device may also share audio from any of its inputs—including its analog ones—with the other multiroom devices.
Original mode maintains the original signal through this device while sharing a digital copy of the audio signal with other devices in the multiroom.
Synchronized mode forces all the devices in the multiroom, including the 371, to share one synchronized digital audio signal.
Bluetooth Audio
Devices may connect to the 371 via Bluetooth to transmit their audio to play through the 371. Before connecting for the first time, the two devices must be paired to each other.
Selecting Pair makes the device visible to nearby devices for up to 30 seconds.
You must Disconnect the audio source when you no longer wish to transmit its audio through the 371. It is not necessary to pair again before reconnecting.
Remote Control
The 371 may link with a MOON BRM-1 remote control (sold separately).
Link Remote searches for a nearby BRM-1 remote control, displaying its unique ID on both devices and permitting them to be associated.
Unlink Remote displays associated BRM-1 units permitting them to be disassociated from this device.
Information displays useful details about the associated BRM-1 units.
Refer to the separate Guide included with the BRM-1 for more information.
MOONLink
MOONLink technology makes MOON products more intelligent. A single button press can trigger automated behaviours and simultaneously operate multiple devices on the network. MOONLink toggles Standby, adjusts display brightness, controls volume, and selects specific inputs on the appropriate devices in the Group.
- MOONLink Group
-
A MOONLink Group is a symbiotic relationship between MOON devices.
- Name
-
The Name identifies a device within the Group.
- Group ID
-
Use the Group ID to assign a number from 1 to 9 to the device.
-
Assigning the same ID to other devices joins them together as a Group.
- Status
-
Select Status to display information about the device.
- Firmware
-
Select Firmware to verify the firmware version of the device and update it when possible.
- Reset
-
Use Reset to revert the name and ID of the device to their default values.
-
Resetting a MOONLink configuration removes the device from its Group.
- Available Devices
-
Select Available Devices to list devices on the network that could be added to a Group.
- MOONLink with Wi-Fi
-
permits devices to form a MOONLink Group while the 371 is wirelessly connected to the network (Wi-Fi) and the other is tethered to the 371 with an Ethernet cable.
Since connecting an Ethernet cable to the 371 normally disables its Wi-Fi connection, MOONLink with Wi-Fi enables the device to remain simultaneously connected wirelessly to a network and wired to MOONLink-compatible components.
The 371 must be configured for use with Wi-Fi before enabling MOONLink with Wi-Fi. Once enabled, connect only devices with MOONLink functionality to the Ethernet ports of the 371.
Holding the button on the front panel for two seconds automatically toggles Standby mode on all the devices in the MOONLink Group.
A MOONLink Group must not include more than one preamplifier.
Display
- Display On
The display may be disabled so that only user interaction temporarily activates the display.
- Brightness
-
Brightness Level
-
Variable from 0% to 100%
- MOONLink Brightness Sync
-
duplicates the brightness adjustments of devices in a MOONLink Group..
- Screen Saver
-
Two screen saver styles are available, which may also be disabled.
- Mode
-
Use the Mode setting to specify which behaviour triggers the screen saver:
-
Activate the screen saver after 20 minutes of silence.
-
Activate the screen saver after 20 minutes of inactivity
- Style
-
display a floating MOON logo or a blank screen.
Volume Settings
The highest volume setting of the preamp is 80.
- Startup Volume
-
Use the Startup Volume parameter to set a default initial volume level.
- Maximum Volume
-
Use the Maximum Volume parameter to set an upper threshold to prevent accidents.
Standby Settings
- Full Power
-
most of the electronics remain powered up while in Standby.
- Low Power
-
most of the electronics remain powered down while in Standby.
- Auto-Standby
-
engages Low Power Standby after 20 minutes of inactivity.
Firmware
Certain hardware components in this device require firmware to function.
- Versions
-
displays the various firmware versions currently installed.
- Update
-
begins the procedure of verifying the availability of newer firmware.
-
If newer firmware is available, the 371 will display a prompt to update its firmware.
-
You may also use the MiND Controller to update firmware.
- Information
-
The 371 displays device information, including its certifications and serial number.
- Reset
-
The reset procedure reverses all customizations—including input configurations—to factory default settings. It does not revert the firmware to an earlier version.
Enjoy your journey
Use the buttons to select which input is playing through the 371, and adjust the volume accordingly using the volume knob.
When using the MiND, the 371 will automatically select the MiND input when the music begins. To listen to Bluetooth audio, select the MiND input on the 371. When a Bluetooth device is connected, its audio will be routed through the MiND.
Control Apps
MOON MiND Controller
State-of-the-art MiND (MOON intelligent Network Device) technology brings together digital music libraries, which continue to increase in size and number, in a sophisticated and intuitive app, adding greater possibilities for the future of music playback. The MOON MiND Controller provides users one clever app to consolidate their music libraries and to control a MOON audio system.
The MiND Controller enables users to stream music from several online services and local network servers, update MOON products automatically, and synchronize playback across devices in multiple Zones simultaneously. The app even makes it easy to mix files from different services into a single coherent playlist. In addition to typical streaming functions, the MiND Controller can toggle Standby, switch inputs, and even control the volume of MOON products anywhere in the home. Only the MiND Controller merges all these features in one straightforward app.
For more information about MOON and MiND, please visit simaudio.com.


Streaming Services & Technologies
Qobuz Connect

Using the Qobuz app instead of the MiND Controller, users may tap the loudspeaker icon to route the music through their 371 using Qobuz Connect.
For more information about Qobuz Connect, please visit https://www.qobuz.com/ca-en/connect.
TIDAL Connect

Using the TIDAL app instead of the MiND Controller, users may tap the loudspeaker icon to route the music through their 371 using TIDAL Connect.
For more information about TIDAL Connect, please visit tidal.com/connect.
Spotify Connect

Use your phone, tablet or computer as a remote control for Spotify.
Go to spotify.com/connect to learn how.
AirPlay

AirPlay is an Apple technology to control audio systems and speakers anywhere on your network with the tap of an iPhone or iPad, or by asking Siri.
This device supports AirPlay, which requires iOS 11.4 or later. AirPlay enables compatible Apple devices to stream audio to the network player, to pause, play, and skip forward or backward, and to control the volume of the preamp from within a wide range of apps like Apple Music and YouTube Music.
Remote Control
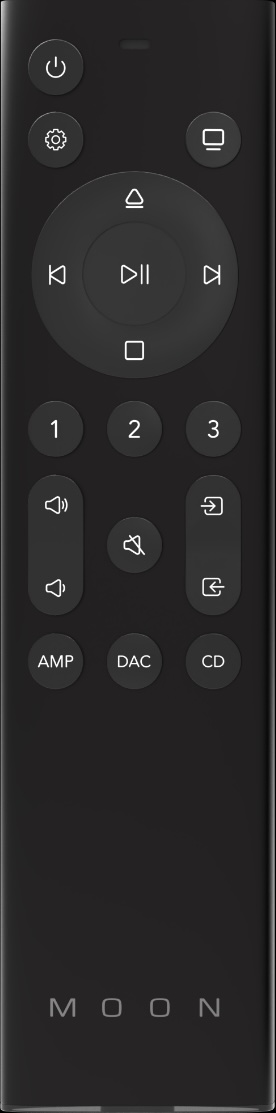
Products in the Compass Collection feature the CRM-4 remote control.
The CRM-4 operates on two AAA batteries (included). Insert the battery compartment token (included in the CRM-4 pouch) into the slot on the bottom of the CRM-4, and turn clockwise to release the battery cover and insert the batteries.
Buttons
The CRM-4 is designed to operate several types of products, notably: a preamplifier, an integrated amplifier, a CD player, and a Digital-to-Analog Converter (DAC). Pressing one of the three buttons at the bottom of the keypad alters which set of commands it emits. To operate the MOON 371, press the AMP button when using the CRM-4 for the first time and after using it with a different type of product.
The buttons on the CRM-4 operate the most common functions of the 371, and many functions on other products as well.
Setup: accesses the extensive configuration menu to personalize the 371
Navigating the Setup Menu
Use the (up) and
 (down) buttons to scroll through the options.
Use
 (OK) to confirm a selection.
Use the
button to cancel a selection or return to the previous menu options.
 Display
-
cycles the display through six levels of brightness.
-
off, dim, 25%, 50%, 75%, 100%


-
recalls saved Internet radio station shortcuts.
Use the MiND Controller to save up to three favourite stations.
The rest of the buttons are as follows:
| Icon | Feature |
|---|---|
|
Standby |
  |
Volume Down/Up |
|
Mute |
   |
Mode |
| |
Input Left/Right |
| ⋅ | Eject |
  |
Previous/Next |
|
Play/Pause |
|
Stop |
Technical Specifications
- Output Power @ 8 Ω
-
100 W
- Output Power @ 4 Ω
-
200 W
- Input Sensitivity
-
0.3 V – 4V
- Input Impedance
-
9.5 kΩ
- Gain
-
40 dB
- Frequency Response
-
5 Hz – 100 kHz +0dB/–3 dB
- Total Harmonic Distortion @ 1 W
-
0.009%
- Total Harmonic Distortion @ 100 W
-
0.003%
- Intermodulation Distortion
-
0.005%
- Signal-to-Noise Ratio
-
108 dB
- Crosstalk
-
–108 dB
- Damping Factor
-
425
- Power Consumption (Idle)
-
30 W
- Power Consumption (Standby)
-
28 W
- Power Consumption (Low-Power Standby)
-
6 W
- Dimensions
-
42.9 cm × 8.7 cm × 38.5 cm
- Width × Height × Depth
-
16.9” × 3.5” × 15.2”
- Weight
-
9 kg
-
20 lbs
Digital Audio Support
| Technology | Sample Rate | MiND | HDMI | Optical | Coax | Bluetooth |
|---|---|---|---|---|---|---|
| PCM & MQA | 44.1 kHz | 🎵 | 🎵 | 🎵 | 🎵 | 🎵 |
| ⋅ | 48.0 kHz | 🎵 | 🎵 | 🎵 | 🎵 | 🎵 |
| ⋅ | 88.2 kHz | 🎵 | 🎵 | 🎵 | ||
| ⋅ | 96.0 kHz | 🎵 | 🎵 | 🎵 | ||
| ⋅ | 176.4 kHz | 🎵 | 🎵 | |||
| ⋅ | 192.0 kHz | 🎵 | 🎵 | |||
| ⋅ | 352.8 kHz | 🎵 | ||||
| ⋅ | 384.0 kHz | 🎵 | ||||
| DSD64 | 2.8224 MHz | 🎵 | ||||
| DSD128 | 5.6448 MHz | 🎵 | ||||
| DSD256 | 11.2896 MHz | 🎵 |
USB Host
- Interface MiND Controller
-
(Library > USB)
- Supported File Systems
-
FAT
-
NTFS
-
EXT2/3/4
- Maximum Capacity
-
determined by file system
-
NTFS: 256 TB
- Maximum File Bitrate
-
200 Mb/s
- Spin Rate
-
5400 RPM / 7200 RPM
- HDD Size
-
2.5”
-
3.5” (with 12 V power supply)
↻ 2025-12-08